Ever wondered how manufacturers cut ultra-precise parts with clean edges and complex curves? That’s where end milling steps in. End milling is the second most-used CNC machining method after turning, and for good reason. Whether you’re shaping stainless steel, aerospace alloys, or durable plastics, end milling gives you the flexibility to remove material exactly where you need it.
With the right setup, you can achieve tolerances as tight as ±0.002 mm and surface finishes as fine as Ra 0.8 µm. That’s the kind of precision that makes or breaks parts in industries like automotive, medical, and electronics. Even better? When paired with adaptive CNC systems, end milling can cut lead times by up to 40% by dynamically adjusting speeds, feeds, and tool paths between roughing and finishing, all in one setup.
We’ve seen how powerful this process is for both prototyping and high-volume runs. In this article, we’ll focus on how end milling works, why it matters, and how you can master it to boost accuracy and efficiency in your own shop.
What Is End Milling?
 End milling is a milling type where a cylindrical cutting tool, called an end mill, removes material in both vertical and lateral directions. Unlike face milling, which primarily cuts with the tool’s sides, or drill bits that plunge axially, end mills can perform in multiple directions. This flexibility makes them ideal for profile cutting, 3D contouring, and machining complex geometries.
What makes the process especially versatile is the design of the tool. End mills come with helical flutes that span both the tip and the side of the cutter. This geometry allows you to mill features such as deep slots, pockets, grooves, keyways, and free-form surfaces. It’s commonly used in producing mold cavities, precision parts, and functional prototypes.
Programming an end milling operation involves a simple formula: feed rate equals spindle speed multiplied by chip load and the number of flutes. With proper tool selection, you can achieve surface finishes between Ra 6.3 and 0.8 µm.
Specialized finishing tools can push this even lower. Advanced designs, like chip-breaker flutes and variable-helix geometries, help minimize cutting forces, reduce tool wear, and improve chip evacuation. In roughing applications above 19 mm diameter, indexable end mills with replaceable inserts are now widely used due to their cost efficiency and faster changeovers.
Why End Milling Is So Important?
With end milling you’re able to handle everything from simple slots to intricate free-form surfaces using the same machine and often the same tool. What makes this possible is a combination of tool design and CNC control precision.
With spindle speed, feed rate, and cutting depth all programmable, you can adapt the machining process to suit a wide range of materials and part geometries.
What really sets the end milling process apart is its ability to achieve ±0.05 mm accuracy while maintaining high material-removal rates. This often eliminates the need for secondary operations, which saves both time and labor.
Whether you’re working with 6061-T6 aluminum, titanium alloys, or CFRP laminates, modern flute geometries and coatings ensure consistent chip evacuation and long tool life.
You’re not limited by material type. From steel and plastics to advanced composites, the right end mill tool, whether it’s a variable-helix carbide rougher or a DLC-coated finisher—can remove material efficiently while achieving a high quality surface.
You can use multi-flute designs to increase axial cutting depth without overloading the tool. CAM-optimized toolpaths, like adaptive clearing and trochoidal milling, reduce cycle time by up to 40% when compared with older methods.
One of the most significant advantages you’ll notice in a production setting is how one CNC milling center can handle roughing, semi-finishing, and finishing in a single clamping. This consolidation not only increases throughput but also minimizes tolerance stack-up from repositioning workpieces.
With modern rotary cutters, you can run machines unattended, relying on real-time monitoring and sensor feedback to detect tool wear.
Efficiency gains go beyond spindle speed and feed motion. Today’s coatings, such as aluminum titanium nitride (AlTiN) and amorphous-diamond, extend tool life up to four times, especially when machining heat-resistant alloys. That directly impacts your cost per part, helping you maintain profitability even when tolerances are tight and materials are challenging.
What is the History of End Milling?
The term “milling” itself dates back to the early 1800s, originally referring to processes that used rotating cutters to shape flat surfaces. However, it wasn’t until the late 19th century that end-cutting tools gained popularity, driven by the rise of high-speed steel and the need for more complex machining capabilities.
A key turning point came in 1918, when Carl A. Bergstrom patented the first industrial helical-flute end mill. This innovation allowed machinists to remove material more smoothly and efficiently compared to straight-flute cutters, especially when dealing with hard metals. The design quickly became the standard for producing accurate and repeatable results in machine shops.
By the 1970s, the integration of CNC controls into milling machines transformed end milling from a manual technique into a programmable, highly repeatable machining process. This transition enabled automated tool changes, consistent feed rates, and complex toolpath generation, all essential for high-speed machining and multi-axis operations.
The 1980s introduced another leap forward with the widespread use of solid-carbide tools. These cutters supported higher spindle speeds and smaller tool diameters, making them ideal for precise work in die cavities, molds, and electronic components.
Later developments in ultra-fine micro-grain carbide and diamond coatings enhanced wear resistance and allowed for consistent chip removal when working with abrasive materials.
In the 1990s, coatings such as titanium nitride (TiN) and titanium aluminum nitride (TiAlN) entered the mainstream. These protective layers increased cutting tool lifespan and enabled dry machining of harder metals. Since then, newer materials like polycrystalline diamond (PCD) and nano-composite coatings have become common in aerospace machining, where heat resistance, dimensional stability, and consistent surface finish are critical.
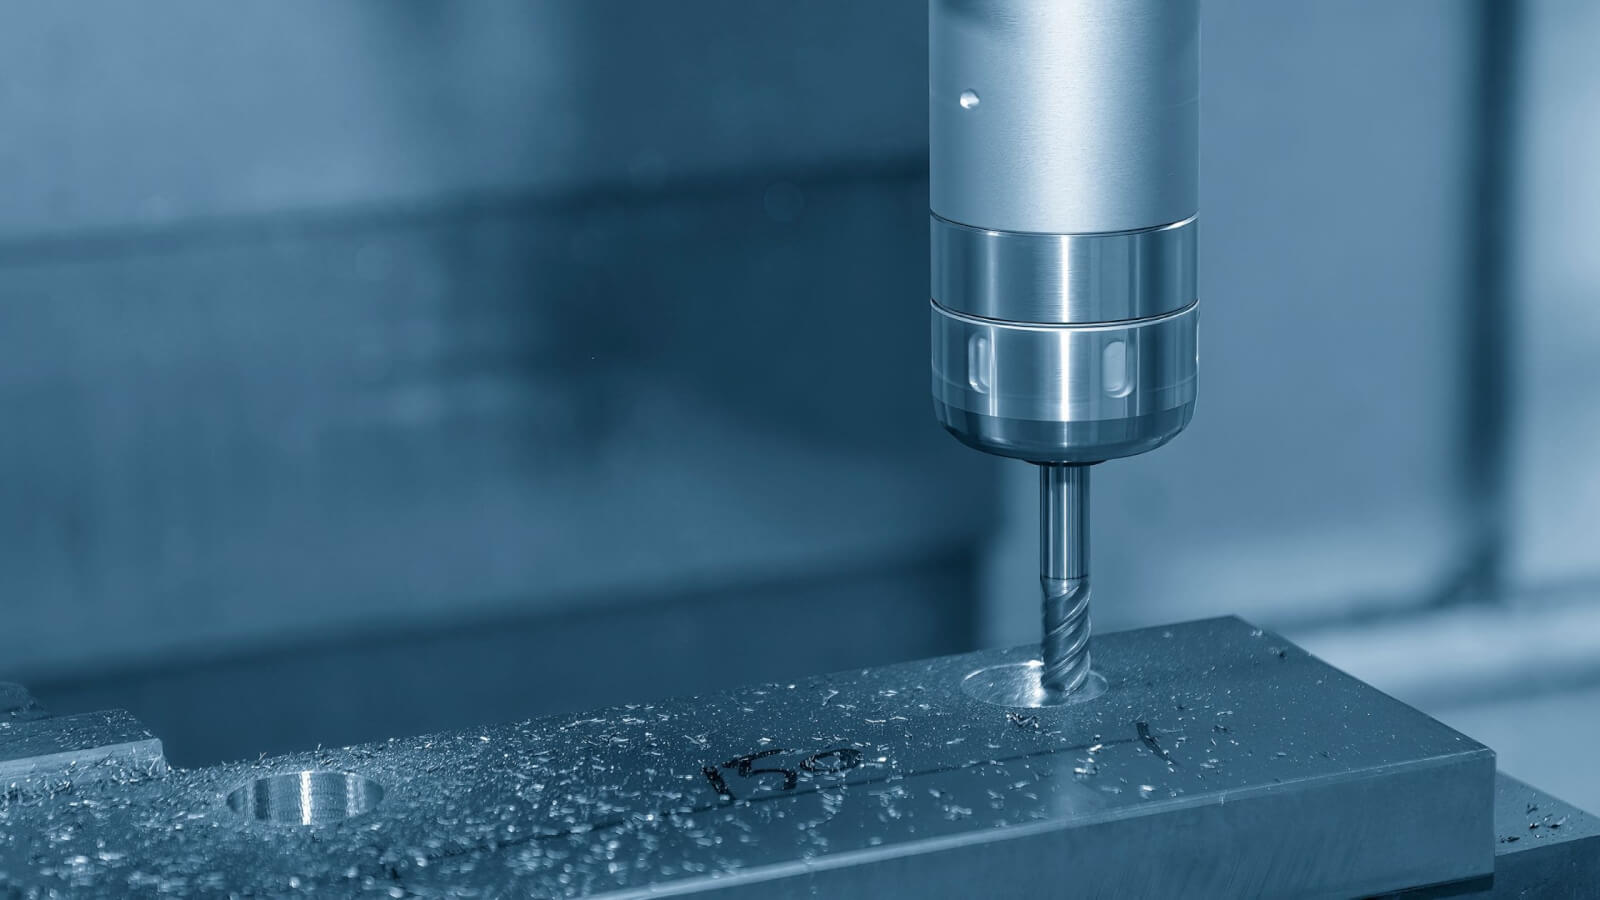
How Does the End Milling Process Work?
 100vw, 1600px” data-lazy-src=”https://www.3erp.com/wp-content/uploads/2025/05/5-min-4.jpg” />The end milling process begins with planning and setup. You start by designing the part in CAD software, then transfer the model into a CAM environment to define toolpaths. These paths include profiles, pockets, and contouring moves tailored to the geometry of the part. Once simulated and verified, the toolpaths are converted into G-code and sent to the CNC machine.</p>
<p>Tool setup follows. The selected end mill is loaded into a balanced tool-holder and installed in the spindle. The workpiece is fixed into place using a vise, modular clamps, or soft jaws, and the machine’s coordinate system is zeroed using a probing cycle or manual touch-off.</p>
<p>Next, you select cutting parameters. These include spindle speed, feed rate, chip load, and coolant strategy. For aluminum, water-soluble coolants are typically used. Titanium and other high-strength alloys may require oil-mist or minimum quantity lubrication.</p>
<p>Matching the right combination of flute count, helix angle, and cutting depth to the material ensures clean cuts and prevents tool overload.</p>
<p>Before the full program is run, a test pass is often performed along a scrap edge. Once conditions are confirmed, the cycle begins. The spindle rotates the tool, which engages the workpiece through either a vertical plunge or a ramp-in entry.</p>
<p>The helical flutes guide chips out of the cutting zone while maintaining surface quality. Feed motion and cutting direction are precisely controlled through the machine’s control system.</p>
<p>Modern systems monitor spindle load and vibration in real time. If forces spike unexpectedly, adaptive control reduces feed to avoid breakage. For finishing, a shallow pass at high spindle speed improves the surface finish, often reaching values below Ra 0.8 microns.</p>
<p>Post-machining steps are just as critical. Tight-tolerance features are inspected with coordinate measuring machines. Deburring removes sharp edges, while surface finish is verified as part of quality control.</p>
<p>For cavities or deep pockets, helical interpolation is used instead of plunging to minimize tool deflection and extend tool life.</p>
<p>A common guideline is to keep tool overhang less than three times its diameter. Longer projections increase deflection and degrade both accuracy and finish.</p>
<p>Ramp-in angles between two and five degrees also reduce burrs, while helping maintain consistent chip formation across variable depths.</p>
<h2 id=) What are the Types of End Mills?
What are the Types of End Mills?
End mills can be categorized in several ways depending on their shape, number of flutes, core material, and applied coating. Each variation influences the cutting action, chip clearance, tool wear, and the overall quality of the surface finish on the final part.
By selecting the right type of tool, you can optimize for different operations like slotting, profiling, pocketing, or 3D contouring. Some end mills are best suited for high-speed finishing, while others are built for roughing operations with high cutting forces.
Whether you’re machining cast iron, stainless steel, aluminum, or composites, your choice of end mill directly affects efficiency, tolerance, and tool life.
To organize this, it’s useful to look at the most common classification methods. These include geometry, flute count, material composition, coating, and specialty application.
Classification by Geometry
The geometry of an end mill defines how it cuts into the material and what types of features it can produce. Shape dictates everything from chip formation to surface smoothness and tool longevity.
Each variation is designed with specific purposes in mind, from flat surfaces and deep slots to 3D contours and fine details.
Some shapes are more suited to plunging, others to finishing. Geometry also influences tool rigidity, which becomes crucial when machining harder materials or when deeper cutting depths are needed. You’ll want to choose your cutter based on the contours of the part, the desired surface finish, and the machine’s spindle power and control system.
Square End Mills
Square end mills have a flat cutting edge that creates sharp, 90-degree corners on a part. They’re the standard choice for general-purpose milling tasks including slotting, edge profiling, and plunge cutting. These tools are commonly used to remove material from a workpiece in straight, clean passes and are compatible with a wide range of materials.
Because of their flat end geometry, square end mills are ideal for machining flat-bottom pockets and slots where sharp edges are required. They’re also useful when machining side walls, shoulders, or performing face cuts on flat surfaces.
Available in multiple flute counts, they can be optimized for roughing or finishing depending on the tool path and feed motion applied.
When combined with coatings like titanium nitride or aluminum titanium nitride, square end mills exhibit improved wear resistance and extended tool life, especially when used in high-speed machining or when working with harder alloys.
Ball End Mills
Ball end mills feature a rounded tip that allows for more fluid toolpaths when machining complex shapes, 3D contours, and curved surfaces. These tools excel in die cavities, mold features, and finishing passes that require a consistent surface along non-planar profiles.
The spherical tip of a ball end cutter allows it to maintain contact with the material even at shallow depths, minimizing tool deflection and promoting a higher quality finish.
They are essential for surface milling where sharp inside corners are either not needed or must be avoided to prevent stress risers in the final part.
Ball end mills are frequently used in industries like aerospace, medical device manufacturing, and mold making, where intricate geometries and precision tolerances are the norm. The right combination of flute count and helix angle allows these cutters to evacuate chips effectively while maintaining surface quality across varied cutting conditions.
Corner Rounding End Mills
Corner rounding end mills are designed to produce smooth, rounded edges on the outside of a part. Instead of leaving sharp corners, which may be prone to cracking or wear, this tool forms radiused transitions that reduce stress concentration and improve the mechanical durability of components. You’ll often use them for parts subject to dynamic loading or wear, such as machine housings or consumer product enclosures.
These tools are also useful in operations that require blending sharp corners into a consistent form, such as finishing die cavities or deburring complex shapes.
Their cutting profile ensures a consistent radius regardless of direction, which is particularly important in parts that will undergo coating or painting.
They differ from other mill cutters in that they do not plunge cut; instead, they perform best with side milling passes where the tool follows the part’s contour. To avoid chatter, choose a proper helix angle and keep cutting depth within the tool’s recommended profile engagement.
Corner Radius End Mills
Corner radius end mills strike a balance between square and ball end geometries. Instead of a sharp 90-degree corner, these tools have a slightly rounded transition where the cutting edge meets the flat end. This geometry improves strength and chip flow, extending tool life while still enabling precision machining of flat surfaces and sharp interior walls.
You should consider corner radius tools when working with materials prone to edge chipping or where a stronger cutting edge is beneficial, like in stainless steels or hardened alloys.
The rounded edge minimizes tool breakage, making it ideal for roughing end operations or semi-finishing steps that precede a high quality surface pass.
In terms of application, they’re commonly used in the production of mold bases, structural brackets, or components requiring profile milling with moderate surface finish needs. This geometry also improves chip evacuation when machining deep pockets and slots, helping reduce tool loading and ensuring more efficient heat dissipation.
V‑Bit End Mills
V-bit end mills, sometimes called engraving bits or chamfer tools, are typically used for shallow detail cutting, engraving text, and beveling part edges. These tools feature a sharp, pointed tip with angled cutting edges, forming a “V” shape. The included angle can vary, commonly 30, 60, or 90 degrees, depending on the level of detail or depth required.
They are especially useful in machining soft materials such as plastics, wood, or aluminum when engraving logos, serial numbers, or fine artistic elements. In harder materials,
V-bits are effective for chamfering sharp corners, breaking edges, or producing a deburred finish directly during cutting.
Because of their concentrated cutting surface at the tip, it’s important to monitor feed rate and spindle speed to prevent tool wear or breakage. Their geometry makes them unsuitable for deep material removal, but ideal for low-force precision tasks and projects that require visual detail rather than structural depth.
Fishtail End Mills
Fishtail end mills have a flat tip with a pointed center, resembling a fishtail, which allows them to start cuts without walking across the surface. This design makes them a preferred choice in woodworking, plastics, and soft composites where clean entry and precise edge control are critical.
The main benefit of fishtail geometry is its ability to initiate cuts without requiring a pilot hole, particularly in thin or delicate stock. It’s a practical option for plunge cutting and profiling operations where clean edges and burr-free finishes are important.
You might use them to machine thin wall panels, acrylic sheets, or circuit board substrates where minimal surface distortion is essential.
In comparison to a drill bit, which may cause tear-out or splintering on soft surfaces, fishtail end mills provide a clean start and reliable finish. Tool life can be extended with high-speed steel variants, and for high-efficiency applications, using tungsten carbide fishtail mills ensures better wear resistance in continuous production settings.
Keyway End Mills
Keyway end mills are precision tools designed specifically for cutting narrow slots that fit keys used in mechanical power transmission. These tools have a straight or staggered flute configuration and are often center-cutting, which means you can plunge them directly into the material. This is particularly useful when machining keyway slots in shafts, pulleys, or gear hubs.
You’ll find that keyway cutters are optimized to maintain tight tolerances across the entire depth of cut. Their robust design reduces tool deflection, even during deeper passes, ensuring consistent width and finish throughout the slot. They are often used in CNC milling machines for both prototyping and production where repeatability is critical.
When choosing a keyway end mill, it’s important to match the tool diameter to the specified key size, and to verify feed rate and spindle speed to minimize chatter. These tools are typically made from high speed steel or solid carbide and may include coatings to improve wear resistance during extended runs in harder materials.
Tapered End Mills
Tapered end mills feature a conical shape that gradually increases in diameter from the tip to the shank. This design provides added strength and rigidity, making these tools ideal for deep cavity machining, mold cores, and complex contours that require angled walls or reliefs. The taper angle varies depending on the intended application, and the tool is often used in both 2D and 3D profiling.
These cutters excel in operations that demand both reach and stability. The tapered geometry helps reduce cutting forces near the tip, where most deflection typically occurs. You might use a tapered end mill when finishing forms that require consistent wall angles or when working on molds that include draft features.
Because of their geometry, tapered mills are less likely to chatter compared to straight wall cutters when machining deep pockets. They are particularly effective in hard-to-machine materials, especially when paired with appropriate coatings like aluminum titanium nitride. The flute count and helix angle must be chosen carefully to ensure efficient chip evacuation and surface quality across varying depths.
Drill Mills
Drill mills combine the functionality of a drill bit and an end mill, giving you the ability to perform multiple operations with one tool. Their point geometry allows for plunge cutting like a traditional drill, while the flutes enable side milling, slotting, and profiling. You can use them to create starter holes, countersinks, chamfers, or V-grooves in a single setup.
They are ideal for situations where space in the tool carousel is limited or when you’re machining simple features that don’t require separate tools.
Drill mills reduce tool change time and setup complexity, which can be valuable in small-batch production or when milling tasks involve varied geometry.
Because they serve multiple functions, it’s critical to align spindle speed and feed motion with the type of cut being performed. While plunge rates need to accommodate axial cutting pressure, side milling requires settings that balance tool wear with edge quality. Drill mills are most effective in softer materials but can also be used in steel, composites, and non-ferrous metals with the correct parameters.
Dovetail End Mills
Dovetail end mills are specialized tools used to create angled slots that interlock with matching shapes. These tools are essential in machining parts for fixtures, jigs, and slide mechanisms where precision alignment is necessary. The tool’s cutting edges are angled outward, matching standard dovetail profiles used across mechanical systems and tooling setups.
In CNC milling, you’ll typically apply dovetail tools after a roughing operation, using them for finishing passes that define the final geometry of a feature. Their performance depends on accurate feed rate control and consistent cutting depth to maintain angle fidelity and finish quality. Some dovetail tools are designed with built-in chip breakers or polished flutes to improve chip evacuation in enclosed slots.
Choosing the right dovetail angle is critical, as variations between metric and imperial systems can cause misalignment. These tools are commonly found in mold base manufacturing, tooling plates, and linear guideways where sliding fit and clean edges are essential.
Roughing End Mills
Roughing end mills are engineered for aggressive material removal in the initial phases of machining. These tools are your go-to choice when speed and efficiency outweigh surface finish. The key to their performance lies in their serrated or “ripper” flutes. These specialized cutting edges break up chips into smaller fragments, reducing heat buildup and lowering cutting forces on the tool.
This chip-segmentation strategy allows you to use higher feed rates and deeper axial cuts without compromising tool stability. When working with harder materials or performing heavy-duty operations on thick workpieces, roughing mills can remove up to 30% more material per pass compared to standard fluted tools.
They’re particularly useful in machining large flat surfaces or removing stock before finishing. Their rugged geometry minimizes vibration, especially in deep cavities or when machining steels and cast iron. Pairing these tools with high-torque CNC machines and efficient chip evacuation setups helps prevent jamming and tool overload, ensuring consistent cycle times and reliable tool life.
Finishing End Mills
Where roughing mills focus on volume, finishing end mills specialize in detail. These tools are designed for the final stages of the end milling process, where surface quality and dimensional accuracy are critical. A typical finishing mill features a greater number of flutes, sometimes five or more, and a polished cutting surface that produces minimal burrs and a high-quality surface finish.
You should use finishing end mills when tolerances are tight and visual appearance matters, like when machining visible parts, injection mold cavities, or aerospace components. Their reduced cutting depth ensures better control over edge definition, contours, and feature geometry.
Because the cutting forces are lower during finishing passes, you can achieve a surface roughness as low as Ra 0.4 µm when using tools with a high helix angle and proper coatings such as aluminum titanium nitride. The key is consistency. Set your spindle speed and feed rate to maintain a stable chip load and minimize deflection throughout the pass.
Roughing and Finishing End Mills
Some tools bridge the gap between bulk removal and refined detail. Roughing and finishing end mills combine the aggressive cutting features of a rougher with the refined edge finish of a finisher. This hybrid tool reduces the need for tool changes, saving you time in multi-stage milling operations.
The flutes on these mills often start with a serrated design toward the tip to initiate stock removal and transition into a smooth profile near the shank for final surface refinement. These tools are especially beneficial in high-efficiency machining strategies, where minimizing downtime and consolidating operations are priorities.
When selecting a roughing-finishing hybrid, keep in mind that tool rigidity and flute geometry must support both chip load extremes. Use them in parts where you can accept a slight compromise in surface finish in exchange for reduced machining time, like engine blocks, structural brackets, or production-grade prototypes.
Classification by Number of Flutes
2-flute end mills feature large chip gullets, making them ideal when you’re machining soft materials like aluminum or wood. They allow chips to clear easily, reducing heat and buildup.
3-flute designs offer a good balance between chip clearance and edge strength. You get a cleaner finish than with 2-flute tools while maintaining reliable chip evacuation in plastics or aluminum alloys.
4-flute tools are the standard for steel and stainless steel. With higher edge strength, they support aggressive feed rates and are commonly used for profile milling and tight-tolerance parts.
5-flute and higher end mills are designed for high-speed finishing, particularly in hardened tool steels. Their tighter flute spacing enhances surface finish and supports deeper axial depths without chatter.
Additionally, chip-splitter flutes and variable-pitch geometries are useful in minimizing vibration, especially when you’re dealing with difficult-to-machine alloys. These designs allow you to increase feed rates by up to 15% without compromising tool life or part precision.
Classification by Tool Material
High-Speed Steel (HSS) end mills are an economical choice. They’re relatively forgiving and well-suited for soft metals and plastics. You’ll find them useful for low-speed operations where flexibility and shock resistance matter more than wear resistance. Maximum cutting speed usually stays under 50 meters per minute.
Cobalt tools (M35 or M42 grades) offer 10% greater wear resistance compared to HSS. They’re preferred when working with tougher materials like stainless steel or titanium. The added hardness allows higher spindle speeds and extended tool life in mid-range production settings.
Solid carbide end mills are your go-to when performance matters most. They’re roughly three times stiffer than HSS and retain hardness up to 800 °C. These tools are ideal for high-speed cutting in materials like aluminum, carbon steel, and even composites. They’re the default choice for precision 3D contouring and deep-die cavity work.
For ultra-precise jobs, micro-grain carbide end mills can deliver edge radii below 5 microns, which is essential for moldmaking or fine-detail copper electrodes.
PCD (polycrystalline diamond) and DLC-coated carbide tools are often reserved for abrasive, non-metal materials such as CFRP and graphite. These tools are engineered to maintain edge integrity and minimize tool changes in long production runs.
Classification by Coating
Titanium Nitride (TiN) is the classic gold-colored coating. It’s versatile, extends tool life by around 30%, and is suitable for general-purpose machining in steel and aluminum.
Titanium Carbonitride (TiCN) is a harder variant, optimized for cast iron and high-silicon aluminum. It reduces edge wear and performs well in interrupted cuts and abrasive materials.
Aluminum Titanium Nitride (AlTiN) and AlTiCrN coatings develop an aluminum oxide layer at high temperatures, providing superior heat resistance. These are ideal for dry or semi-dry machining of tool steels and are common in high-speed production environments.
Diamond-Like Carbon (DLC) coatings feature ultra-low friction and high chemical resistance. Use them in non-ferrous metals and carbon-fiber composites where material welding or delamination is a concern.
CVD Diamond coatings, including amorphous-diamond composites, are used in high-abrasion environments. These coatings reduce friction to nearly zero, allowing a fivefold increase in tool life when machining graphite electrodes or green ceramics.
Classification by Helix Angle
The helix angle is the angle formed between the cutting edge and the centerline of the tool. It directly affects cutting forces, chip flow, and the resulting surface finish.
- Low helix (~30°): You’ll use this for tough materials like carbon steel or cast iron. These tools create more radial force, but less axial pull, which helps prevent the tool from digging in or lifting the part. They are ideal when maintaining tool stability is your main concern.
- Medium helix (~40°): This is the all-rounder. It balances cutting force and chip flow, making it a great default choice for general-purpose end milling tasks across a wide range of materials.
- High helix (>45°): Best suited for aluminum and softer non-ferrous alloys. These aggressively remove material, eject chips upward, and minimize built-up edge on the cutting surface.
- Variable helix (e.g., 35°–42°): Designed to disrupt the harmonic resonance often created at high spindle speeds. This style reduces chatter and allows you to increase feed rates by up to 20% in aerospace alloys or composites.
Specialty End Mills
Some machining projects push beyond standard geometries, that’s where specialty end mills come in. They’re engineered for unique use cases where performance, tool life, or part geometry demands a tailored solution.
- Corner-radius–plus–rougher: This hybrid design combines chip-breaking serrations and rounded corners, allowing one-pass semi-finishing in hardened die cavities.
- Long-reach or reduced-shank tools: You’ll need these when working deep inside molds or engine blocks. Their necked-down body maintains rigidity while reaching into spaces over six times the tool’s diameter.
- Compression cutters: If you’re cutting plywood, laminated materials, or carbon-fiber composites, these tools reduce delamination. They pull the top and bottom surfaces inward, giving you a clean edge on both sides.
- T-slot and Woodruff cutters: These are designed for specific groove shapes that standard tools can’t access — think keyways, undercuts, and specialty slots in fixtures or shafts.
- Modular “switch-blade” end mills: These allow rapid geometry changes by swapping carbide inserts with different profiles, helping you cut changeover time without resetting stick-out or tool length.
Solid vs. Indexable End Mills
You’ll encounter two main construction types in end milling tools: solid and indexable. Each has distinct advantages depending on your machining strategy, workpiece material, and required tolerances.
Solid carbide end mills are typically your best option for diameters under 19 mm (¾ in). Their one-piece construction offers excellent rigidity and minimal run-out, allowing for tight tolerances (±0.01 mm) in finishing operations. This makes them ideal for precision parts where detail and surface finish matter, such as aerospace housings or precision molds.
Indexable end mills, on the other hand, shine in roughing operations. Once you hit larger diameters, especially 19 mm and above, solid tools become costly and slow to resharpen. Indexable tools use a steel or carbide body and interchangeable carbide inserts. This cuts down tooling costs by up to 50% since you only replace the insert. You also reduce machine downtime by avoiding full tool resets.
Insert pockets do introduce minor tolerance stack-up (around ±0.05 mm), so it’s smart to follow up roughing with a solid finishing tool if dimensional accuracy is tight. These tools let you mix and match insert grades, like TiCN-coated K20 for cast iron or C25 with PVD coating for stainless, maximizing tool life across multiple machining operations.
Which End Mills Are Best for Stainless Steel?
When machining stainless steel, you need tools that withstand intense heat, minimize work-hardening, and maintain consistent performance under load. You’ll get the best results by choosing 4-flute or 5-flute solid carbide end mills designed specifically for stainless applications. These tools strike the right balance between chip evacuation and edge strength, important because stainless steel tends to generate high cutting forces and retain heat.
For coatings, opt for TiCN or AlTiN. TiCN handles abrasive wear well, while AlTiN forms a heat-resistant oxide layer that supports higher spindle speeds and cutting depths. Use them in combination with high-pressure coolant systems above 70 bar to improve chip clearance and control thermal buildup, especially in slotting and side milling applications.
Also, prioritize end mills with variable-helix geometry—something in the range of 35° to 38°. This small but critical detail helps disrupt harmonic vibrations and reduces chatter, which in turn minimizes work-hardening and extends tool life. A smart pairing of helix angle and chip splitter geometry will help you maintain a high-quality surface finish, even in hardened or austenitic stainless grades.
If your setup supports adaptive toolpaths and real-time spindle load monitoring, you’ll further reduce the risk of tool breakage. The right combination of cutting tool geometry, coating, and coolant strategy makes end milling in stainless steel more consistent and predictable, even in multi-pass profiling or 3D contouring scenarios.
How to Choose Which End Mills Are Best for You?
Start by identifying your material type and hardness. Then determine whether you’re roughing, semi-finishing, or finishing. Each stage requires a different flute count, cutting depth, and feed strategy. For example, if your CNC machine has limited torque at high RPMs, prioritize tools with fewer flutes and sharper rake angles to reduce cutting forces and improve chip evacuation.
Keep the tool overhang as short as possible to avoid deflection. A high number of flutes might boost feed rate in steels, but can clog up in soft materials if chip evacuation isn’t optimized. This is especially important when milling the cutting surfaces of deep slots or narrow cavities.
Don’t skip over manufacturer data sheets—these often include chip load calculators, recommended spindle speeds, and thermal behavior charts. Run test cuts in a small section of the workpiece to check how the tool performs. If your job runs dry or with mist coolant, coatings like TiB₂ or ZrN are better for aluminum. AlTiN, on the other hand, thrives under minimal lubrication in heat-resistant steels.
Which Workpiece Materials Are Suited for End Milling?
 100vw, 1600px” data-lazy-src=”https://www.3erp.com/wp-content/uploads/2025/05/2-min-5.jpg” />Aluminum alloys like 6061 and 7075 benefit from high-speed cutting and excellent chip evacuation. Here, polished 3-flute end mills with a high helix angle (45°–55°) and TiB₂ coatings prevent built-up edge formation and ensure clean chip removal. For mild steel such as AISI 1018, 4-flute high-speed steel or uncoated carbide cutters provide good balance between cost and wear resistance.</p>
<p>When machining stainless steels like 304 or 316, tool wear and heat become critical. You’ll want a 4-flute solid carbide end mill coated with AlTiN, combined with lower surface speeds to reduce tool degradation. Tool steels such as H13 (up to HRC 50) require rigid setups, 6-flute micrograin carbide, and trochoidal toolpaths to manage heat buildup and load distribution effectively.</p>
<p>Titanium alloys like Grade 5 demand variable-flute geometries and radial engagement under 25% of the tool diameter. Here, TiAlN coatings resist oxidation and help extend tool life.</p>
<p>For plastics like Delrin, PE, or PC, single or 2-flute O-sharp cutters prevent melting and maintain dimensional accuracy. Advanced composites such as CFRP or GFRP are best handled with PCD or diamond-coated compression tools, which resist delamination and minimize burrs at entry and exit points.</p>
<p>You should also consider tungsten-carbide end mills with polished flutes and a 0° helix when cutting high-silicon aluminum. This setup minimizes chip welding and enhances surface finish, especially when dry machining.</p>
<h3 id=) Are Non-Metal Materials Suitable for End Milling?
Are Non-Metal Materials Suitable for End Milling?
Absolutely. While metals dominate most CNC milling projects, non-metal materials are just as suited for end milling, provided you match the tool design to the unique behavior of each material.
For plastics like acrylic, polycarbonate, or nylon, you’ll want cutters with razor-sharp edges and reduced flute counts. Single- or two-flute tools with polished surfaces are best. These allow better chip evacuation and reduce friction that can otherwise melt or deform the workpiece. Acrylic, in particular, responds exceptionally well to diamond-polished single-flute end mills, producing optical-grade edges without secondary polishing.
Wood-based materials like hardwood, MDF, or plywood can be machined with standard carbide tools, but compression cutters work best when edge quality is a priority. These combine upcut and downcut flutes to compress the material and eliminate splintering on both faces.
Composites, including GFRP, CFRP, and layered synthetics, require precision. Use low-helix, sharp-edged cutters with PCD or CVD diamond coatings to avoid frayed fibers or matrix chipping. Coolant is typically avoided with hygroscopic plastics and fibrous composites, as moisture or thermal shock can lead to unpredictable deformation.
What are the Machines and Tools Required for End Milling?
 100vw, 1600px” data-lazy-src=”https://www.3erp.com/wp-content/uploads/2025/05/3-min-6.jpg” />Whether you’re producing aerospace components or simple brackets, machine and tooling selection defines the limits of what you can accomplish.</p>
<p>To operate effectively, your setup should include the following components:</p>
<ul>
<li><b>CNC Vertical Machining Center</b>: Choose a 3-, 4-, or 5-axis system with a spindle speed range between 8,000 and 20,000 rpm. More axes allow for complex shapes and surface milling in fewer setups.</li>
<li><b>Tool-Holders</b>: Use ER collets, shrink-fit chucks, or hydraulic chucks capable of run-out ≤ 5 µm for precision machining operations.</li>
<li><b>Work-Holding</b>: Vises, dovetail fixtures, vacuum tables (for plastics), and modular tombstones help stabilize the workpiece during the milling process.</li>
<li><b>Integrated Tool-Changer</b>: A carousel holding 24–120 tools supports complex jobs involving multiple cutting tools.</li>
<li><b>Coolant and Lubrication Systems</b>: Flood, through-spindle coolant, or minimum quantity lubrication (MQL) systems are essential. Include a chiller to stabilize coolant at 20°C.</li>
<li><b>Touch Probe Systems</b>: Probing ensures in-cycle part location and tool length measurements, maintaining tight tolerances.</li>
<li><b>Chip Management and Extraction</b>: Install conveyors or augers for chip evacuation and mist extractors for oil-based coolants to keep the environment safe and clean.</li>
<li><b>Control Systems</b>: A responsive touchscreen control system paired with offline CAM software ensures seamless toolpath generation and execution.</li>
<li><b>Tool Balancing and Spindle Accessories</b>: Use balancing rings and pull-stud drawbars for high-speed tool stability. Include spindle-mounted air blast for dry machining, especially in carbon composites or when surface finish must remain contamination-free.</li>
</ul>
<h2 id=) What are the Important Parameters of End Milling?
What are the Important Parameters of End Milling?
Each parameter of end milling affects chip formation, heat dissipation, and overall machining performance. Here’s a comprehensive list of the core parameters you need to control:
- Surface Speed (V_c): Calculated as π × tool diameter × rpm. Influences temperature and wear on the cutting edge.
- Spindle Speed (rpm): Always set below the coating’s maximum allowable surface speed. Higher speeds reduce cutting forces in soft materials but risk coating breakdown in hard metals.
- Feed Rate: Formula: rpm × number of flutes × chip load. Adjust by ±10% after evaluating first-piece inspection results.
- Axial Depth of Cut (a_p): For roughing, limit to ≤ 50% of tool diameter. Finishing passes typically use 5–20% of the diameter.
- Radial Width of Cut (a_e): Up-milling or adaptive strategies should maintain engagement around 10–25% of the tool diameter.
- Tool Stick-Out: Should not exceed 3× tool diameter. If unavoidable, reduce axial depth of cut by 30% to prevent chatter.
- Coolant Flow Rate: Ensure ≥ 4 liters per minute per kilowatt of spindle power. Coolant type depends on material and tool coating.
- Tool Holder Balance Grade: G2.5 at 20,000 rpm is recommended for vibration-free milling, especially in multi-axis operations.
- Step-Over Strategy: Use constant or variable strategies depending on desired scallop height and cutter engagement.
- Chip Thinning Correction: When radial engagement drops below 50% of tool diameter, adjust feed rate by multiplying the programmed chip load by the ratio of tool diameter to (2 × a_e). This keeps chip thickness consistent and prevents rubbing instead of cutting.
Which Advanced Techniques and Tool Path Strategies Enhance End Milling?
High-speed machining (HSM) is a foundational technique. It uses shallow axial depths of cut and high spindle speeds to generate constant chip thickness. This helps minimize cutting forces and eliminates thermal shocks that could degrade coatings or reduce dimensional accuracy.
Trochoidal milling is another strategy, ideal for machining slots or pockets in tough metals. It creates a circular motion that reduces radial engagement. This significantly lowers cutting forces and can reduce cycle time by as much as 40%, especially in hardened steels or titanium alloys.
Adaptive clearing dynamically adjusts tool engagement to keep spindle load consistent. You get more efficient use of available power—70 to 80% spindle load—without chatter, even in complex geometries. This technique shines during roughing operations in workpieces with changing contours.
Modern CAM software enables these techniques and more. It simulates dynamic engagement and analyzes potential tool wear hotspots. You can even implement rest-roughing and step-reduction paths to minimize air-cutting and shorten program times.
Other advanced techniques include:
- Helical Milling: Ideal for large-diameter holes. A slow ramp-down at a 3° entry angle eases cutting pressure and heat concentration.
- Spring Cuts and Hybrid Toolpaths: Use these to refine quality surface finish, reaching Ra values below 0.4 µm.
- Ramp Cutting: Especially effective when plunging into dense materials; this method reduces axial cutting pressure and extends tool life.
In Which Industries Is End Milling Used?
 100vw, 1600px” data-lazy-src=”https://www.3erp.com/wp-content/uploads/2025/05/6-min-5.jpg” />In aerospace, end milling is used to create critical parts such as turbine disks, wing ribs, and engine-mount brackets. These components demand tight tolerances and high quality surface finishes, often machined from difficult-to-cut alloys. Here, ball end mills and flute end mills are chosen for profiling and plunge cutting, especially when dealing with complex internal features.</p>
<p>The automotive and electric vehicle sectors rely on end milling to manufacture engine blocks, cylinder-head water jackets, and lightweight aluminum battery trays. CNC milling machines with high spindle speed are commonly used to remove material from these parts in both roughing and finishing passes.</p>
<p>In medical device manufacturing, tools like square end mills and micro-diameter flute end mills are used to shape titanium hip stems and orthopedic screws. These parts often require a polished finish, which is achievable with properly coated mill cutters and optimized machining parameters.</p>
<p>Electronics manufacturers employ end milling to create aluminum housings for smartphones, as well as to drill intricate patterns in printed circuit boards. Delicate surface qualities are essential here, especially when dealing with heat sinks or thermal interfaces.</p>
<p>Tool and die shops frequently use flat end mills for mold cavities and engraving. These operations require precise feed rate control and advanced coatings like aluminum titanium nitride for wear resistance.</p>
<p>Finally, in rapid prototyping, end milling is ideal for producing single-run fixtures or test units in under 24 hours. Whether you’re machining plastics, composites, or nonmetals, the ability to adapt tool selection and machining process to your project makes end milling a go-to choice.</p>
<h2 id=) What are the Advantages and Disadvantages of End Milling?
What are the Advantages and Disadvantages of End Milling?
Choosing end milling over other cutting methods isn’t just a preference, it’s a strategic decision that shapes how you handle complex parts, material removal, and final surface finishes.
Let’s break down where end milling shines, and where it might hold you back, so you can decide if it fits your machining needs.
Advantages of End Milling
One of the strongest advantages of the end milling process lies in its ability to create intricate forms and contours in a single setup using modern CNC machines. Below are eight key benefits:
- High precision: Typical tolerances of ±0.05 mm; finishing tools can achieve up to ±0.002 mm.
- Excellent surface finish: Common finishes of Ra 0.8 µm; with the right tooling, this can reach Ra 0.4 µm.
- Versatility in operations: Supports side milling, profile milling, plunge cutting, slotting, and contouring in one setup.
- Multi-axis capabilities: CNC multi-axis machines allow machining of intricate and complex geometries.
- Tool variety: Options include flat, ball nose, corner radius, and multi-flute end mills for different materials and part requirements.
- Material flexibility: Suitable for cutting metals, plastics, composites, and hardened alloys.
- Hole-starting capability: Some end mills can begin holes directly, eliminating the need for a drill bit and reducing tool change time by up to 10%.
- Ideal for complex parts: Best suited for components with multiple contours, internal slots, and small features requiring tight toolpaths.
Disadvantages of End Milling
End milling isn’t without its trade-offs. Precision often comes at a cost, literally. To achieve those clean cuts and controlled feed rates, you’ll need high-performance carbide end mill tools, balanced tool holders, and a rigid machine platform. That upfront investment adds up, particularly in low-volume runs or prototyping projects.
Here are eight limitations related to end milling:
- Higher initial costs: Requires high-performance carbide tools, precision holders, and rigid CNC platforms.
- Setup complexity: Demands skilled operators for proper fixture setup and toolpath programming.
- Risk of tool deflection/breakage: Especially in deep pockets, hard materials, or with excessive tool stick-out.
- Thermal management challenges: Generates heat in deep cavities; poor cooling or chip evacuation can distort parts or clog tools.
- Slower for large surface removal: Less efficient than face milling or fly cutting for removing material from large flat surfaces—feed rates for face milling can be 30% faster.
- Tool wear: High cutting speeds and forces accelerate wear on tools, especially when machining hard materials without adequate lubrication.
- Limited reach: Deep pockets may require extended-reach tools, which increase vibration and reduce accuracy.
- Potential for chatter: Poor setup or excessive tool length can lead to vibrations that affect surface quality.
What Challenges Occur in End Milling and How to Overcome Them?
No matter how advanced your CNC milling setup is, the end milling process isn’t immune to challenges. From tool vibration to heat stress, a single overlooked detail can compromise both tool life and part quality. Knowing what to expect, and how to react, makes all the difference.
- Chatter and vibration: Reduce tool stick-out as much as possible. Variable-pitch flute end mills can break up harmonic vibrations. Use shrink-fit tool-holders to add damping and boost balance during high-speed cutting.
- Tool breakage: For hard materials, switch to TiAlN or DLC-coated carbide tools. Keep an eye on spindle-load spikes, these often indicate over-engagement. Optimizing ramp entry angles also protects the cutting edge during plunge cutting.
- Excessive heat: Choose climb milling to force heat into chips rather than the workpiece. Apply through-spindle coolant for deep cavity jobs or when machining thin walls.
- Chip packing: Increase flute count or opt for chip-splitter roughing end mills to improve chip evacuation, especially in sticky alloys like aluminum or stainless.
- Setup time: Use modular zero-point fixturing systems. These can cut your setup time in half and reduce errors when repeating jobs.
- Tool cost and replacement: Balance axial (a_p) and radial (a_e) depths of cut to minimize wear. Use CAM-integrated tool-life counters to automatically flag tools for replacement when wear approaches 90%.
What are the Key Safety Considerations in End Milling?
The combination of high spindle speeds, sharp tools, and metal chips flying at velocity means there’s no room for error. Following best practices isn’t optional; it’s essential.
Start with the basics:
- Always wear safety glasses, hearing protection, and cut-resistant gloves. Chips can reach temperatures of 400 °C and bounce unpredictably off surfaces.
- Make sure your machine’s safety interlocks work. The spindle should automatically stop if a door opens during operation.
- Use chip shields or conveyors to manage swarf buildup. When working with oil-based coolants, add a mist extractor to protect your lungs.
Pre-run checklist for every job:
- Confirm correct end mill tool installation and orientation, especially if you’re switching between square end and ball end tools.
- Check coolant levels, tool length offsets, and ensure workpieces are secured tightly in fixtures or vises.
- Torque pull studs correctly to avoid dangerous tool pull-out at high spindle speeds.
What Factors Affect Surface Finishing and Tolerances in End Milling?
You might have the right cutter geometry and feed rates dialed in, but if you’re still getting burrs or poor surface qualities, something deeper could be at play. Surface finish and tolerance control in end milling depends on a tightly choreographed set of variables—from chip formation to spindle temperature.
- Scallop height affects roughness: The relationship is simple—h ≈ (step-over)² / (8 × cutter radius). Keep your step-over small for a smoother finish.
- Tool geometry matters: Higher helix angle (above 45°) reduces cutting forces and helps produce clean edges, especially in aluminum and plastics.
- Feed rate and spindle speed: There’s a sweet spot, usually around 80% of the spindle’s critical speed—where vibration is minimized and surface finish improves. Too slow, and you’ll get rubbing; too fast, and you’ll generate chatter.
- Thermal stability: Maintain coolant temperature within 20 ± 1 °C to ensure μm-level consistency in parts—particularly important in aerospace or mold machining.
- Multi-pass finishing: Take a light spring pass (~0.05 mm) after roughing. It clears deflected material, improving tolerance stack-up.
What are the Key Considerations and Best Practices for End Milling?
Start with tool material. If you’re machining soft metals or plastics, high speed steel (HSS) or cobalt cutters offer good value. For harder materials or high-production runs, solid carbide tools with titanium nitride or aluminum titanium nitride coatings will deliver longer tool life and better wear resistance.
Next, consider the flute count. A lower number of flutes, such as 2 or 3, helps with chip evacuation in materials like aluminum. For steel or stainless steel, 4 to 6 flute end mills offer greater edge strength and smoother side milling.
To get started on the right foot, follow these seven essential best practices:
- Match your feeds and speeds to both material and tool coating. Use manufacturer charts as a baseline, but fine-tune based on real-time part results.
- Keep run-out below 0.005 mm. Poor concentricity shortens tool life and harms surface quality.
- Balance your tool holders to G2.5 grade or better, especially for high-speed spindles above 10,000 rpm.
- Inspect tool edges every 60 minutes of cut-time when machining steels. Look for signs of edge chipping or coating breakdown.
- Re-grind and rotate tools before they reach 30% wear. You’ll maintain cutting performance and reduce chatter caused by uneven edge wear.
- Use climb-only toolpaths when finishing and leave 0.2 mm stock from roughing to maintain tolerance and achieve a quality surface finish.
- Keep your cutting depth conservative, no more than 50% of tool diameter, especially for beginners or when machining complex shapes or deep cavities.
Is End Milling Expensive?
End milling isn’t always costly by default, but it can become expensive quickly depending on your application. If you’re dealing with tight tolerances, high-hardness alloys, or multi-tool setups, the costs add up fast. Still, with smart planning, you can control and even reduce these expenses.
Several factors influence the cost of the end milling process. Tool selection is one of the biggest drivers. Carbide tools typically cost two to three times more than high-speed steel, but they also last longer and support higher spindle speeds.
The type of material you machine, the required surface finish, and the tolerance levels all impact total cost. For instance, demanding a ±0.01 mm tolerance can increase your machining time by as much as 25 percent.
If you’re working with exotic alloys like titanium, expect greater tool wear. That means more frequent tool changes and shorter tool life, increasing your overall spend. Custom fixtures also matter, while they improve accuracy, they can drive up unit cost in small production runs. Precision inspection and CAM simulation, however, often reduce scrap rates and justify higher upfront programming costs.
For larger production batches, switching to indexable cutters instead of solid tools can lower your tool cost by 30 percent or more, especially in roughing operations.
How Can Cost and Efficiency Be Optimized in End Milling?
To get the best return on your milling operation, focus on reducing downtime and increasing tool performance. One of the easiest wins is improving workholding efficiency. Quick-change vises and modular fixturing can slash setup time by up to 70 percent. If you’re still using manual setups, this upgrade is low-hanging fruit.
Toolpath optimization also plays a huge role. Modern strategies like adaptive clearing or constant-engagement toolpaths balance cutting forces, reduce heat buildup, and extend tool life, especially useful in harder metals like stainless steel or tool steels. These methods maintain consistent feed rates and allow you to push the process faster without increasing tool wear.
Another tip: combine roughing and finishing when the part geometry and tolerance allow. Using dual-purpose cutters reduces tool changes and streamlines production. For more complex shapes, invest in high-performance flute end mills designed to handle both passes effectively.
Don’t overlook digital support. Tool life management software and predictive maintenance sensors alert you before tool failure or spindle degradation occurs. Tracking spindle speed trends and chip formation can help you refine your machining parameters in real time.
Smart inventory tracking also matters. When you monitor cutter usage and automate reordering, you reduce stockouts and minimize disruption during critical jobs.
How Does End Milling Compare to Other Milling Methods?
Choosing between milling techniques is about matching the tool to your part’s geometry, material, and production needs. Whether you’re removing large amounts of stock or working on precision details, understanding how end milling stacks up against other methods is essential to making the right decision.
End Milling vs. Face Milling
End mills cut on both their end and periphery, while face mills rely primarily on the outer edges of their cutting inserts. This fundamental difference shapes how each process removes material from a workpiece. End milling is ideal when you’re profiling contours, cutting deep pockets, or working around complex 3D surfaces. It gives you the flexibility to cut vertically and laterally, especially useful when machining die cavities or custom enclosures.
In contrast, face milling is all about producing extremely flat surfaces. It’s the go-to technique for planing down large plates or finishing the tops of workpieces. While face mills have limited axial depth, typically around 2.8 mm per pass, they allow for faster feed rates and larger tool diameters, improving efficiency for broad, shallow passes.
That said, the quality surface finish of face milling often surpasses what you can achieve in a single pass with end mills.
So if you’re machining the face of an engine block or preparing stock for further cuts, face milling wins. But if you’re working around corners, creating pockets, or dealing with geometry that requires directional flexibility, end milling is your better option.
End Milling vs. Drilling
Drilling and end milling may both remove material from a workpiece, but their approach and intent couldn’t be more different. A drill bit has a pointed chisel edge and is designed solely to create cylindrical holes. Its feed motion is strictly vertical, making it efficient for high-speed hole production, but limited in versatility.
End milling, on the other hand, enables a range of motions and results. With center-cutting designs, an end mill can perform plunge cutting similar to a drill, but with added advantages. You can use helical interpolation to create large-diameter holes with tighter tolerances and smoother finishes than standard twist drills. It’s especially helpful when working with composites or non-metals where reducing delamination is key.
End milling also lets you machine slots, keyways, contours, and intricate features, all in a single setup. So while you might still reach for a drill bit for speed and simplicity, end mills offer much broader utility when your project calls for accuracy, complexity, and flexible tool paths.
End Milling vs. Traditional Milling
The fundamental distinction lies in chip formation and tool orientation. In conventional or “up” milling, chips form thick-to-thin as the cutter rotates against the feed direction. This increases friction, elevates heat, and can push the part out of position on lighter setups.
End milling, especially when performed as climb milling, reverses this chip flow, cutting thin-to-thick. The result is a cleaner surface, reduced work-hardening, and lower cutting forces. However, it demands precision, your milling machines need to be backlash-free to avoid tool chatter and positional drift.
Another clear advantage is versatility. While traditional face milling is restricted to removing material from flat surfaces, end mills offer much more. You can machine slots, drill starter holes, cut internal corners, and finish complex shapes using ball nose, flat end, or corner radius end mills. In fact, with the right geometry, an end mill can handle surface milling tasks typically done by face mills, just with slightly lower efficiency on wide planar surfaces. But try cutting a deep pocket or a tight radius slot with a face mill, and you’ll quickly see its limitations.
If you value flexibility across a range of machining operations, end milling provides a sharper edge, literally and figuratively.
What is the Difference Between End Milling and Slab Milling?
Slab milling and end milling may both remove material from a workpiece, but they serve very different purposes. Slab milling uses a wide cylindrical cutter that removes large amounts of material quickly from flat surfaces. It’s great for roughing operations on plates or block stock and typically delivers excellent chip evacuation due to its larger cutting diameter and slower spindle speeds.
End milling, in contrast, excels in precision and complexity. It uses smaller tools that can plunge axially, making it ideal for intricate machining tasks like contouring, profiling, and slotting. You’re not just limited to flat surfaces, you can tackle tight internal corners, mill around thin walls, and even interpolate precise holes with spiral toolpaths.
While modern slab milling often runs in climb mode to reduce tool deflection, end milling may alternate between climb and conventional passes depending on feature geometry. For example, on delicate components like injection mold details or thin-walled aerospace parts, alternating strategies help manage burr formation and edge finish.
How Can You Maintain and Care for End Mills?
Start by cleaning thoroughly. Use an ultrasonic bath with a neutral pH detergent to dissolve machining residues without dulling the cutting edges. Once clean, blow-dry the end mill using compressed air to avoid oxidation or edge corrosion, especially for high-speed steel and uncoated carbide cutters.
Proper storage is just as critical as cleaning. End mills should be stored vertically in foam-lined trays organized by shank diameter. This prevents flutes from contacting each other and damaging cutting edges—especially important for ball end mills and flute end mills with sharp geometries.
Inspect tools every 60 minutes of active cutting. Once flank wear reaches 0.1 mm, schedule a re-grind. Quality tungsten carbide tools often tolerate up to three re-sharpening cycles without losing dimensional precision. Use laser-etched ID numbers to track tool life in your CAM or tool-management software. This makes it easier to flag dull cutters before they compromise your part’s tolerances.
If you’re using high-speed steel tools in humid conditions, apply a thin layer of rust-inhibitor oil before placing them into long-term storage. This reduces oxidation, especially on low-usage tools stored near coolant-rich machines or mist-lubricated environments.
Ultimately, the maintenance process protects more than the tool—it safeguards your production outcomes, machine uptime, and customer satisfaction.
Conclusion
End milling isn’t just a machining method, it’s how you bring precision parts to life. From carving out tight corners in mold cavities to shaping complex aerospace components with smooth finishes, this process gives you the freedom to handle just about any material or geometry.
As you’ve seen, success in end milling isn’t just about having the right cutting tool. It’s about choosing the right number of flutes, getting your speeds and feeds dialed in, and knowing how to adapt when things change. When you combine good technique with smart CAM programming, the result isn’t just a part—it’s a process that runs smoother, faster, and more cost-effectively.
At 3ERP, we get it. You want parts done right, the first time. That’s why we offer on-demand CNC milling services and parts, from one-off prototypes to full production runs, with tolerances as tight as ±0.01 mm. With over 15 years of hands-on experience, we work closely with you to fine-tune designs, speed up timelines, and reduce waste without sacrificing quality.
So whether you’re creating a single prototype or scaling up for mass production, we’re here to help you make it faster, smarter, and better.