Let’s say you’ve got a new design in hand and you’re eager to see it come to life—without spending a fortune on injection molds or waiting weeks for production. That’s where vacuum casting steps in. This process uses negative pressure to pull liquid resin into a silicone mold, letting you create accurate, high-quality copies of your master model with impressive detail and smooth surface finishes.
It’s not just a quick fix—it’s a smart solution for prototyping and low-volume production.
Whether your parts start from CNC machining or 3D printing, vacuum casting helps bridge the gap between early-stage prototypes and full-scale manufacturing.
One of the biggest perks? Tight tolerances down to ±0.05 mm and lead times as short as 10–15 days. Depending on the silicone formulation, a single mold can yield 20 to 25 parts, while high-temperature vulcanized (HTV) options can produce between 300 and 500 units.
In 2024, the vacuum casting market was valued at USD 3.82 billion. That number’s projected to climb to USD 6.42 billion by 2034—driven by industries that need flexible, repeatable solutions without compromising on quality.
So if you’re looking to test a design, launch a pilot run, or just need solid results without committing to expensive tooling, this might be the right move for you. In this article, we’ll focus on how vacuum casting works, why it’s gaining ground, and what you need to know to use it effectively.
What is Vacuum Casting?
 Vacuum casting is a casting process in which liquid resin, usually polyurethane or similar thermoset material, is drawn into a flexible silicone mold under vacuum. This negative pressure eliminates air bubbles and ensures the resin fills the entire mold cavity, capturing all the fine details of the original master pattern.
The process is highly valued for its ability to replicate a high-quality master model with excellent dimensional accuracy, surface texture, and material consistency.
Working temperatures during casting generally range from 25 to 40 °C, which helps maintain the resin’s flow characteristics and curing profile. Before filling the mold, the vacuum chamber typically reaches an evacuation level below 5 mbar. These conditions optimize flow into complex geometries and help suppress gas entrapment in the mold halves.
It’s important for you to account for a 0.15% linear shrinkage rate when designing your parts. This slight dimensional change can affect the outcome of the final cast model if not considered during the initial design phase. Despite its simplicity, vacuum casting supports precision and repeatability across a wide range of production runs, making it a favored option in small-scale manufacturing settings.
Is Vacuum Casting the Same as Urethane Casting?
No. Urethane casting is a specific form of vacuum casting that uses two-part polyurethane systems to create plastic parts. While both methods rely on negative pressure to remove air pockets and improve mold filling, the term vacuum casting refers to the broader technique of using vacuum to draw any compatible casting resin into a soft mold.
You might see the terms used interchangeably, especially in community discussions or product datasheets, because polyurethane resins are by far the most common materials used in vacuum casting. However, the equipment and method can also accommodate specialty elastomers, epoxy systems, and even silicone-based resins, depending on the project’s requirements.
Understanding this distinction helps you navigate different material options and choose the right process based on your application. Whether you’re producing functional prototypes, custom components, or consumer products, the vacuum casting process offers more flexibility than urethane casting alone.
Short History of Vacuum Casting
Vacuum casting emerged in the late 1960s as aerospace manufacturers sought an economical alternative to simulate injection-molded components for wind tunnel testing. Traditional methods such as full-scale injection molding were too expensive and inflexible for prototype projects or short development cycles. The new approach allowed engineers to create accurate parts with complex geometries using silicone molds and low-pressure vacuum techniques, reducing both lead time and tooling costs.
By the early 1970s, Japanese mold-tool suppliers began commercializing the process. They introduced the practice of pairing CNC-machined aluminum master patterns with room-temperature-vulcanized silicone molds.
This development enabled a more consistent casting process, opening the door to wider industrial adoption. The transition from one-off experimental setups to repeatable production methods marked a turning point in the evolution of small-scale manufacturing techniques.
In the 1980s, vacuum casting saw further adoption across European automotive OEMs, particularly for interior components and under-the-hood prototype parts. These companies relied on the process to produce high-quality master models for design validation and fit testing before committing to full-scale production. One of the most important milestones came in 1994, with the introduction of the first integrated vacuum casting machine capable of mixing, degassing, and curing within a single system. This advancement improved throughput, part quality, and repeatability in batch production runs.
Since then, vacuum casting has become one of the most trusted techniques used in rapid prototyping and low-volume production. Its adaptability, combined with material versatility and dimensional accuracy, has made it a go-to method for creating consumer products, automotive prototypes, and medical device enclosures.
How Does the Vacuum Casting Process Work?
The vacuum casting process follows a clear sequence that transforms a digital or physical design into a set of production-quality plastic parts. It begins with the creation of a master model, often generated by 3D printing or CNC machining.
This model serves as the template for forming a silicone mold. Once the mold is prepared, it is used to cast resin under vacuum, eliminating trapped air and ensuring dimensional accuracy.
The entire workflow can be broken into seven key stages: producing the master pattern, creating and curing the mold, cutting the mold to form cavity access, preparing and degassing the casting resin, filling the mold under vacuum, curing the part, and finally, post-processing and finishing. These steps ensure that each cast model replicates the master pattern in detail.
You’ll find this method especially effective for rapid prototyping, small-scale production runs, or when evaluating alternatives to injection molding with significantly lower tooling costs.
Step 1 – Creating a Master Model
The first step is producing a high-quality master model. This can be achieved through SLA or SLS 3D printing or precision CNC machining, depending on the required geometry and surface finish. Materials selected for this stage must offer dimensional stability and resolution sufficient to reflect the desired features of the final part.
After fabrication, the surface of the model is carefully treated to remove any roughness, aiming for a finish of ≤ Ra 0.4 µm if a gloss surface is needed. This directly affects the final surface texture of vacuum cast products. Proper surface preparation is essential, as any imperfections on the master model will transfer to every unit produced using the silicone mold.
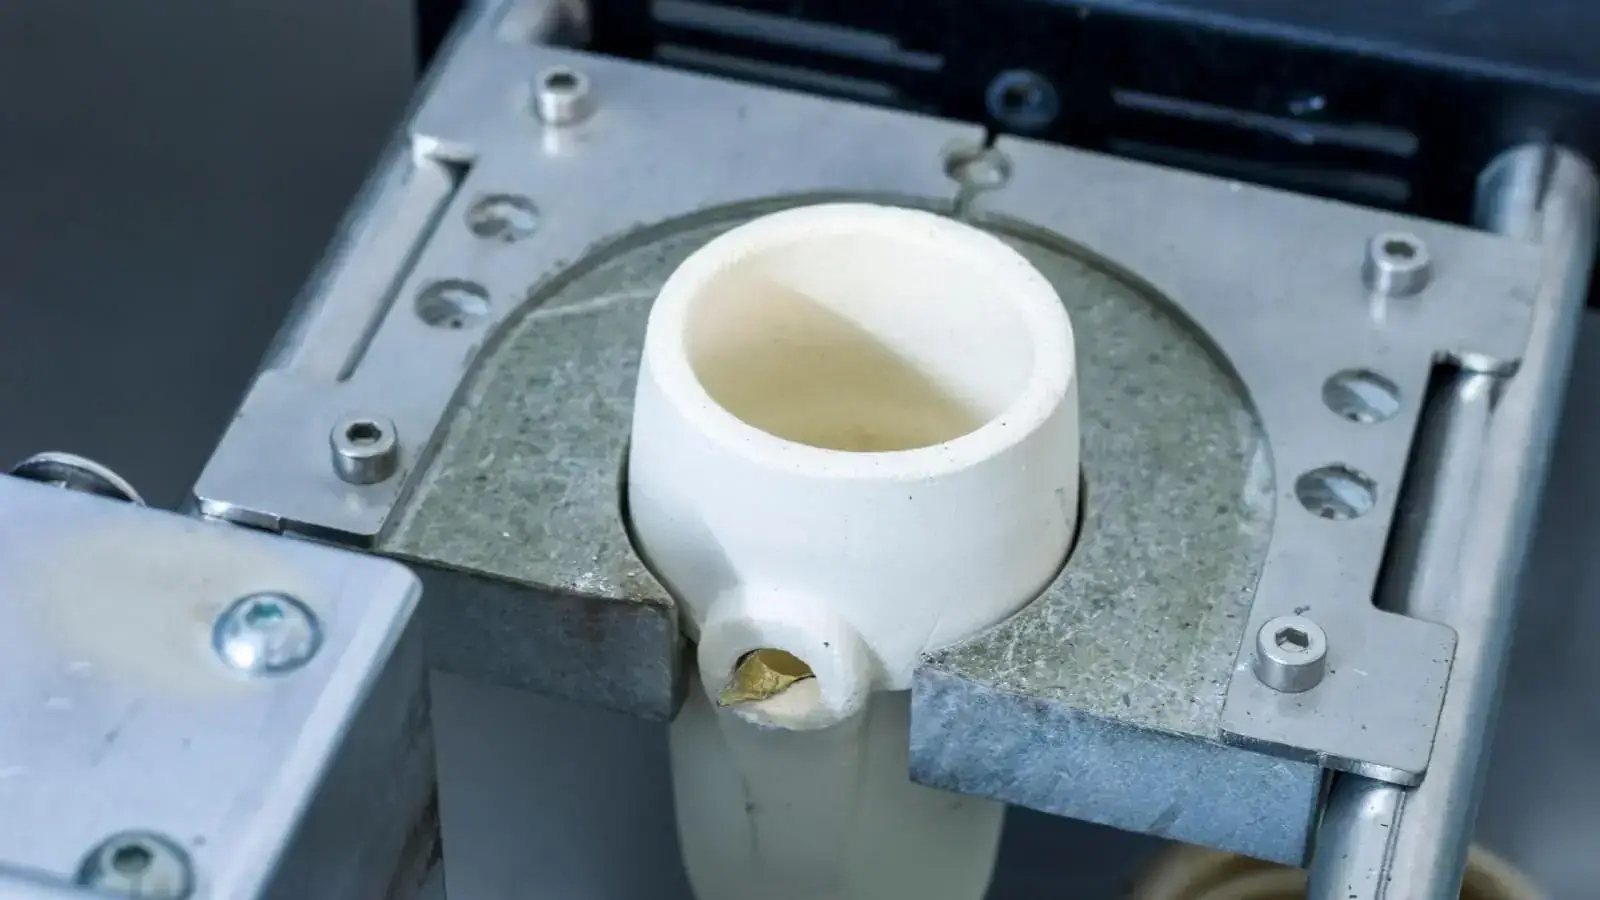
Step 2 – Making the Silicone Mold
Once the master model is ready, it is positioned inside a casting box, typically suspended using risers to ensure even silicone flow. Platinum-cure RTV silicone, selected for its low shrink rate and high detail fidelity, is then mixed and degassed to eliminate air bubbles before being poured around the model.
The silicone is poured carefully to prevent turbulence and entrapped air, which could affect the mold cavity. After pouring, the assembly is placed in an oven to cure at around 40 °C for 8 to 16 hours, depending on the silicone formulation. Curing ensures the mold achieves its target Shore A hardness (usually 40–50), allowing it to maintain shape and dimensional accuracy across multiple casting cycles.
Step 3 – Cutting the Mold
After the silicone mold has cured, it must be split to allow for part removal and resin injection. This is done using a wave-line cutting technique, which follows an irregular pattern to create natural alignment keys. These keys are essential to preserve the vacuum integrity during the casting phase, ensuring consistent part quality.
Shops that prioritize repeatability and dimensional accuracy may opt to CNC-cut the mold’s split line, particularly for complex geometries. This automated approach minimizes variability and improves alignment across batch production.
The mold halves must align precisely to avoid flash material or dimensional drift in the final parts. A well-executed cut ensures clean separation and longer mold life, especially when producing large quantities of parts with tight tolerances.
Step 4 – Preparing the Casting Resin
Before you begin casting, the selected resin must be carefully conditioned to ensure consistent part quality. Start by pre-heating the resin to 40 °C. This improves fluidity and helps it flow easily through the mold cavity, especially in narrow or detailed sections. Once heated, the resin is placed in a vacuum chamber for degassing. This step typically lasts 50 to 60 seconds and is essential for eliminating trapped air bubbles that could affect the dimensional accuracy and surface finish of your vacuum cast parts.
At this stage, you can also introduce color pigments into the resin, usually between 0.5% and 3% by weight. This allows for color consistency straight out of the mold without requiring painting later. Choosing the correct type of casting resin, whether it’s polyurethane, elastomeric, or epoxy, depends on the desired performance, flexibility, and final application of the component you’re producing.
Step 5 – Casting Under Vacuum
Once the resin is prepared, it’s time to fill the mold. The silicone mold is placed inside a vacuum casting machine and the chamber is evacuated down to a pressure of 5 mbar or lower. This negative pressure is critical for pulling the resin into every detail of the mold cavity, minimizing air traps and ensuring full cavity wet-out, especially in complex geometries.
The resin is poured from a single, controlled entry point. Rather than using force or multiple fills, gravity allows the resin to naturally flow into the mold, reducing turbulence and preserving the accuracy of the casting process. This method works well for batch production and ensures repeatability across multiple units.
You’ll find that this approach is particularly effective when producing small-scale vacuum casting products, where consistent wall thickness, material properties, and dimensional stability are critical to your final outcome.
Step 6 – Curing the Part
Once the mold is filled, the casting resin needs to be cured to achieve full mechanical integrity. The mold is typically transferred to an oven set between 60 °C and 80 °C.
Depending on the type and volume of resin used, this thermal curing process lasts between 30 and 90 minutes. The elevated temperature accelerates the chemical reaction inside the mold cavity and helps maintain consistent part quality.
For parts requiring maximum durability or post-processing like machining or coating, an optional post-cure step is performed. This involves storing the parts at room temperature for up to seven days. The extended cure allows the resin to stabilize and reach its full set of physical properties.
Step 7 – Demolding and Final Processing
After curing, the mold halves are gently separated, and the solidified part is removed. The demolding process must be done carefully to avoid deforming any thin walls or undercut features. Once demolded, the part is trimmed to remove gates and runners, and any remaining flash material is sanded using 1000-grit abrasive for a smooth surface.
Depending on the requirements of your application, you can perform various post-processing steps. These may include spray painting, vacuum metallizing for a reflective finish, vapor polishing for optical clarity in transparent parts, or silk screening for labels and interface markings.
These finishing techniques enhance both the aesthetic and functional properties of the vacuum cast part.
By the end of this stage, your part is ready for use, assembly, or shipment—providing a reliable alternative to injection molds for small production volumes or rapid prototyping.
What are the Common Techniques Used in Vacuum Casting?
While the standard method involves gravity-feeding resin into silicone molds under vacuum, additional techniques have evolved to expand the range of parts that can be made with this manufacturing process.
The most commonly used technique is traditional gravity-feed vacuum casting, where resin flows into the mold cavity under vacuum conditions.
This is the go-to for general applications in low volume production, including consumer products and rapid prototyping.
Dual-shot over-molding is another technique used in vacuum casting when you need to combine rigid and flexible materials in a single part, for example, phone cases with integrated soft grips made from elastomers.
Insert casting allows you to embed metal or plastic components inside the resin.
This is particularly useful for brackets, threads, or reinforcement structures in mechanical assemblies. When fine ribs or thin-walled areas are present in the master model, pressure-assist post-casting can be employed.
This step forces resin deeper into the mold after the vacuum cycle, ensuring complete fill and dimensional accuracy.
Phased casting is used for long or flat parts that are susceptible to deformation. In this case, jigs or external supports are used to stabilize the mold during resin fill and oven curing.
These manufacturing techniques give you more control over surface finish, part quality, and mechanical strength, especially when scaling from prototype projects to small-scale production runs.
What Machines and Equipment are Used in Vacuum Casting?
 100vw, 1600px” data-lazy-src=”https://www.3erp.com/wp-content/uploads/2025/06/8-min-1-min.webp” />The vacuum casting process relies on specialized machinery to ensure repeatability, dimensional accuracy, and high-quality surface finish.</p>
<p>The most essential equipment includes vacuum chambers, casting machines, and optionally, pressure chambers for post-casting optimization.</p>
<p>These tools are designed to support consistent production runs, whether you’re making 3D printed prototypes, urethane casting components, or production-grade consumer products in small batches.</p>
<p>A vacuum casting machine typically integrates functions such as resin degassing, mold evacuation, resin injection, and oven curing. These systems are built to handle different silicone mold sizes and can accommodate various types of casting resins, including polyurethane, elastomers, and epoxy-based materials.</p>
<p>Some setups are automated, with programmable cycles for temperature, vacuum pressure, and resin mixing, an important feature when scaling up to low volume production or managing multiple mold cavities at once.</p>
<p>Choosing the right equipment depends on your project scope. For prototyping labs, compact systems are often preferred, while manufacturers focused on batch production tend to invest in larger vacuum casting machines with advanced control features and higher throughput capacity.</p>
<h3 id=) Vacuum Chambers
Vacuum Chambers
Vacuum chambers are essential in silicone vacuum casting because they remove entrapped air from both the resin and the mold cavity. There are two main types: bench-top chambers and cabinet-style chambers.
Bench-top models are more compact, with typical chamber diameters ranging from 300 mm to 500 mm. They are ideal for prototype projects, research labs, and educational facilities working with a limited mold volume.
Cabinet chambers, on the other hand, support larger silicone molds—up to 900 mm in diameter—and are better suited for short production runs and casting larger parts. These units achieve evacuation levels below 10 mbar in less than one minute, allowing for efficient degassing and mold fill cycles.
Pressure Chambers
Pressure chambers are used to assist curing and reduce surface defects after the mold has been filled. Unlike vacuum chambers that remove air, pressure pots apply force, usually in the range of 4 to 6 bar, to compress any residual air bubbles and enhance resin flow into fine features like ribs or thin-walled sections.
These low-cost systems are especially helpful when working with fast-setting casting resins or when degassing time is limited. If you’re working on silicone mold casting in environments where high throughput matters, a pressure chamber offers a simple but effective way to improve surface texture and structural integrity.
Pressure-assisted post-casting can also reduce the need for extensive post processing, such as sanding or filling voids, making your workflow faster and more consistent across batches.
Automated Vacuum Casting Machines
Automated vacuum casting machines are designed to streamline the entire casting process, making them ideal for short-run manufacturing and rapid prototyping workflows. These systems combine key stages, resin mixing, degassing, silicone mold filling, and oven curing—into a single, programmable unit.
For companies aiming to increase throughput or reduce manual intervention, these turnkey machines offer consistent results across multiple parts with minimal operator input.
Several industry-standard machines illustrate the capabilities of modern vacuum casting equipment.
The Renishaw 5/01 handles mold sizes up to 530 × 450 × 420 mm and typically costs around USD 45,000. It’s a popular choice for medium-volume production runs. The MCP 4/04 accommodates much larger molds, up to 900 × 750 × 600 mm, making it well-suited for bulky or multi-cavity projects.
For smaller part volumes, the Scott AM 1000 supports up to 1 kg of cast weight per cycle, ideal for elastomers or rigid polyurethane resins. With these machines, you can achieve around 50 vacuum cast parts in just two days.
What Materials are Used in Vacuum Casting?
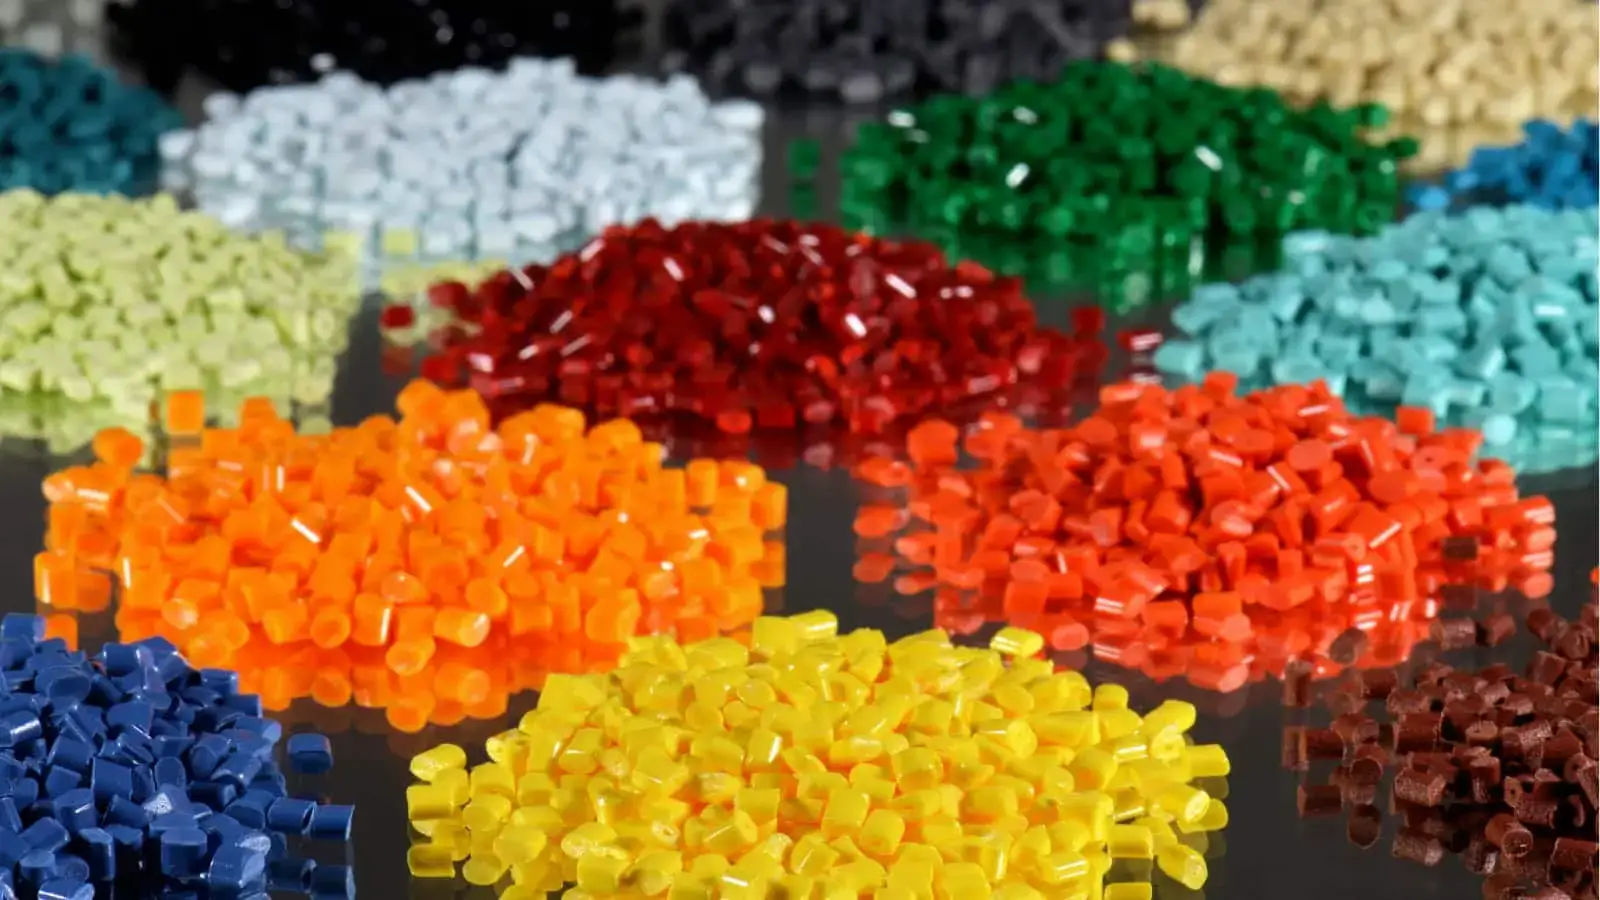 The most commonly used materials for vacuum casting include polyurethane resins, such as ABS-like, PC-like, and elastomeric types, as well as epoxy systems and specialty silicones.
These resins are selected for their ability to replicate the surface finish, dimensional accuracy, and mechanical properties of end-use plastics.
Silicone molds, especially room-temperature-vulcanized (RTV) types, are essential in the process, providing flexible cavities to form precise shapes without damaging the cast model.
Beyond just rigid plastics, the process accommodates soft-touch elastomers and high-performance resins for specialty applications. Engineers working on consumer products, medical devices, or automotive components often rely on these vacuum casting materials for pre-launch testing or small scale production runs.
Silicone Mold Materials
Silicone molds used in vacuum casting are typically made from either tin-cure or platinum-cure RTV silicones. The difference lies in both performance and longevity.
Tin-cure silicones tend to shrink between 1–4%, which can affect part quality over multiple casts. In contrast, platinum-cure options shrink less than 0.2%, offering better dimensional control for vacuum casting products.
For optimal balance between flexibility and durability, a Shore A hardness of 40–50 is recommended. This hardness range ensures that the mold can release castings easily without tearing or distortion.
Translucent formulations are often preferred for visual inspection, helping identify air bubbles trapped in the mold cavity during degassing.
High-temperature vulcanized (HTV) silicone can extend mold life dramatically, reaching up to 300–500 castings per master pattern when properly maintained, making it cost-effective for batch production and complex mold geometries.
Polyurethane and Resin Materials
Polyurethane resins dominate the vacuum casting process due to their wide performance range and ability to simulate production-grade thermoplastics.
For rigid parts, ABS-like grades such as UP4280, PX100, and PX250 offer Shore D hardness between 78–82, ideal for enclosures and structural components. PC-like resins like PX510 and UP6160 push that higher to D82–86, bringing enhanced strength and clarity for applications such as light covers and display windows.
If you need impact resistance, PP-like UP5690 and PC-like PU8098 are often used in products requiring durability.
For functional testing with engineering-grade stiffness, glass-filled nylon analogs provide elevated tensile modulus. Soft-touch applications benefit from TPE-like elastomers such as UP8400 (black or white) and translucent T0387, which offer elongation above 250%.
Clear resins like PMMA-type X522HT deliver high optical clarity for lenses or transparent casings. Additional variants include heat-resistant PU/POM-like systems, food-grade options for compliant consumer goods, fire-retardant types for electronics, and conductive or foam-filled formulations for specialized applications.
What are the Applications of Vacuum Casting?
 100vw, 1600px” data-lazy-src=”https://www.3erp.com/wp-content/uploads/2017/03/2-min.jpg” />Vacuum casting is widely used for functional prototypes, bridge production, and custom end-use parts in industries that require both dimensional accuracy and surface finish.</p>
<p>Whether you’re developing consumer goods, medical equipment, or automotive components, this technique supports small scale production runs with excellent repeatability. The ability to vacuum cast detailed geometries using polyurethane resin or silicone makes it ideal for testing product designs before full injection molding.</p>
<p>Because vacuum casting allows replication of high quality master models, you get near-final part properties using cost-effective silicone molds.</p>
<p>This is especially useful when you need rapid prototyping, niche production volumes, or market testing before tooling up for high-cost manufacturing processes.</p>
<p>Its adaptability across different material types and manufacturing techniques means you can simulate thermoplastics, elastomers, or even rigid metal-like finishes with just a few mold cavities and a vacuum casting machine.</p>
<h3 id=) Automotive Prototyping
Automotive Prototyping
In the automotive industry, vacuum casting plays a crucial role in accelerating product development cycles. You’ll find it especially valuable when building dashboards, air-vent ducts, lens covers, and housing elements that require both functionality and presentation-quality finishes. Engineers use vacuum casting to evaluate part fit, finish, and form before transitioning to injection molds for mass production.
Automotive OEMs frequently rely on the vacuum casting process for low-volume interior trims used in pre-series vehicles. These production runs offer a cost-effective way to test user interaction with physical components without investing in permanent tooling. The flexibility of casting vs injection molding makes this an ideal technique for creating temporary but precise parts for performance validation in both static and dynamic tests.
Medical Devices
Vacuum casting is also used in the medical sector to create highly customized and patient-specific parts. If you’re designing diagnostic sensor housings, biocompatible orthotic shells, or personalized prosthetic components, this process gives you the control and consistency needed for safe, real-world testing. The materials used in vacuum casting, such as ISO 10993-compliant resins, support essential medical-grade requirements.
Applications of vacuum casting in healthcare also include enclosures for portable medical devices, ergonomic handles, or even translucent components for visual inspection. Thanks to the precision of silicone molds and dimensional accuracy of the cast model, you can achieve repeatable part quality with minimal post processing.
Aerospace Components
Vacuum casting is frequently used in the aerospace industry for non-structural parts where lightweight construction and rapid development are essential. You can produce components like internal ducting, cabin wall panels, or low-temperature fairings without the cost or delay of traditional molding techniques. These parts are typically needed in small quantities for wind-tunnel testing, mock-ups, or ergonomic studies.
Since aerospace projects often go through several design iterations, the flexibility of vacuum casting offers engineers a fast, repeatable solution. Silicone molds paired with polyurethane resin allow the creation of detailed, lightweight parts with reliable wall thickness control and surface finish. This helps maintain precision in early-stage prototyping or during low volume production runs while meeting aerospace-grade dimensional accuracy standards.
Consumer Products
In consumer product development, vacuum casting offers a practical path to testing new designs in real-world conditions before full-scale manufacturing. You can create functional enclosures for wearable tech, pilot-run phone cases, or ergonomic grips with soft-touch finishes. Over-molding techniques allow you to pair rigid urethane bases with elastomeric TPE-like materials, simulating production-grade feel and durability.
Small batch runs, often under 500 units,are perfect for early-market launches, focus groups, or investor demos. Using silicone molds and urethane casting materials, you can explore different color pigments, textures, and performance attributes without retooling.
It’s a preferred method when you’re evaluating product-market fit while still in the rapid prototyping phase, especially when you’re working from a 3D printed or CNC-machined master pattern.
Electronic Industry
Vacuum casting plays a strategic role in the electronics sector, where aesthetics and function are tightly linked. It enables you to build enclosures, user-interface panels, or testable sensor housings using both transparent and opaque casting resins. For example, combining PC-like clear polyurethane with black ABS-like shells allows you to visualize internal LED behavior while keeping the housing durable and polished.
Many components used in handheld devices, industrial controls, and IoT systems benefit from this process. Whether you’re casting a single housing or a full batch of 200 pilot units, vacuum casting helps you maintain consistency and detail in every mold cavity. If your project involves touchpoints, backlit features, or embedded design changes, this method supports fast revisions without major tooling investment.
Food and Beverage Equipment Prototyping
Vacuum casting is gaining ground in food and beverage prototyping, especially when fast, clean evaluations are needed. You can use food-grade urethane casting materials that meet FDA compliance to prototype pump housings, mixer components, and soft-touch user interfaces.
These resins simulate the performance of thermoplastics without requiring injection molds, which keeps costs low during early development.
One of the biggest benefits is your ability to test ergonomic dispensing handles under real-world use, without committing to final tooling. Transparent polyurethane resin also allows internal flow visualization.
How Is Vacuum Casting Used in Low-Volume Manufacturing?
Vacuum casting is a proven solution for low-volume manufacturing and machining, bridging the gap between one-off prototypes and full injection molding.
You can achieve functional parts with production-level surface finish and dimensional accuracy in batches of 10 to 500 units, ideal for pilot runs, pre-launch series, or limited editions.
If your project scales quickly, mold duplication strategies let you clone your original silicone mold and double or triple part output. This makes the process scalable without compromising part quality.
From finalizing a master model to casting vacuum-ready parts, the total lead time typically stays under four weeks, even for complex geometries.
You can handle design changes without excessive downtime, which makes this technique ideal for iterative product development. Whether you’re prototyping or producing actual end-use parts for vacuum casting products, the fast cycle time and low tooling investment offer real value in small scale production runs.
What are the Benefits of Vacuum Casting?
Vacuum casting offers several distinct advantages that make it ideal for prototype projects and small-scale production runs. You’ll benefit from design flexibility, affordable tooling, fast lead times, and high part quality, all without committing to full-scale injection molds.
- Design Flexibility: You can experiment with undercuts, variable wall thicknesses, and integrated bosses without tooling complexity, making it easier to iterate product designs.
- Low-Cost Tooling: Silicone molds typically cost between USD 200 and 1,000, offering a cost-effective alternative to aluminum or steel injection molds.
- Fast Turnaround: You can expect production runs to be ready within 10 to 15 days, making vacuum casting a strategic choice for rapid prototyping.
- High-Quality Surface Finish: Cast parts replicate the master model’s surface texture precisely—whether you need gloss, matte, or textured finishes.
- Excellent Dimensional Accuracy: Most vacuum cast parts achieve ±0.05 mm accuracy, ensuring tight tolerances across batches.
- Near-Zero Material Waste: The process uses only what’s needed, reducing excess resin and supporting sustainable manufacturing techniques.
- Multi-Material Capability: You can cast both rigid and elastomeric materials in a single part through over-molding.
- Color Matching from the Mold: Pigments are added before casting, so there’s no need for costly post-processing to achieve custom colors.
What are the Limitations and Considerations of Vacuum Casting?
Although there are advantages, there are certain limitations you’ll need to account for with vacuum casting, primarily mold lifespan, size limitations, and a narrower material range compared to injection molding.
- Limited Mold Lifespan: Standard silicone molds degrade after 20–25 casts, though high-temp vulcanized (HTV) silicone can stretch this to 300–500 uses. Mold fatigue affects both dimensional accuracy and surface finish over time.
- Size Constraints: The maximum casting box volume is generally limited to ≈ 900 × 750 × 600 mm. That means large parts may require segmentation or an alternative casting method.
- Material Limitations: Vacuum casting is not compatible with molten metal, thermoplastics, or high-temperature polymers used in injection molding. You’ll work mostly with polyurethane resins and elastomers.
- Shrinkage Rate: Expect a typical shrinkage of around 0.15%, which must be considered during the design phase for precise dimensional control.
- Manual Process Dependency: Vacuum casting requires skilled labor for mold setup, casting, and demolding. This can result in slight variability in part quality, especially during high-volume batch production.
What Surface Finishing Options are Available in Vacuum Casting?
Depending on your project’s needs, the surface finish can be dictated by the master model’s quality, the mold release used, or the resin formulation. Silicone vacuum casting allows you to reproduce fine details like grain patterns and logos.
- Vacuum Metallising; This process adds a reflective metal-like layer to consumer goods such as phone cases or cosmetic packaging. It’s used to enhance surface texture and perceived value.
- Vapour Polishing; Clear parts made from PMMA-like polyurethane resin benefit from vapour polishing, which improves clarity by smoothing out microscopic tool marks.
- Silk-Screen and Pad Printing: These are ideal for adding logos, button labels, or functional markings on user-interface panels and enclosures.
- In-Mold Texturing; This technique allows texture to be embedded during casting, improving grip or reducing visible fingerprints on soft-touch elastomer components.
What are the Post-Processing Techniques Used After Vacuum Casting?
Once parts are demolded from silicone molds, you’ll typically perform manual or semi-automated operations to meet final product standards. This applies to both rapid prototyping and low volume production environments.
- Trimming and Flash Removal; Excess flash material is trimmed with precision blades, and edges are polished to restore dimensional accuracy and surface finish.
- Painting and Dyeing: While pigments can be added during casting, custom color matching may still require painting or dyeing for surface consistency, UV resistance, or branding.
- Assembly and Bonding: Multi-part components, such as cases and gaskets, are often assembled using adhesive or mechanical joining methods.
- Ultrasonic Welding of Inserts: Thermoplastic inserts or threaded metal components can be added using ultrasonic welding for durability and mechanical strength.
- Polishing and Buffing: Clear and glossy finishes may need additional buffing to remove micro-defects, particularly for consumer-facing applications.
- EMI Shielding Sprays: For electronics enclosures, conductive coatings are applied to block electromagnetic interference and improve performance.
- Conformal Coatings: These transparent protective layers safeguard electronic components from moisture, dust, and corrosion.
- Surface Texture Enhancement: Fine-tuning the surface with soft sanding, matte sprays, or tactile coatings increases usability and appeal in consumer products.
What are the Key Technical Specifications for Vacuum Casting?
The most critical specifications include tight tolerances, fast lead times, and flexible part sizes. These parameters help you balance quality, speed, and cost when choosing between vacuum casting vs injection molding or other manufacturing methods.
You can typically expect tolerances of ±0.05 mm or ±0.3% of part dimension, whichever is greater. This level of dimensional accuracy depends on the quality of the high quality master model, the silicone mold, and material shrinkage control.
Lead times range from 10 to 20 days, depending on part complexity, resin selection, and post-processing.
Vacuum casting molds made from RTV silicone usually last 20 to 25 casts, while HTV silicone extends usability up to 300–500 parts. The maximum part envelope supports sizes up to 750 × 750 × 900 mm, making it suitable for most vacuum cast consumer products, including dashboard components and medical housings.
When working with 3D printed masters or parts produced via printing or CNC machining, you can achieve surface finishes as smooth as Ra 0.4 µm.
What are the Tolerances Achievable with Vacuum Casting?
The tolerances you can achieve in vacuum casting depend on the part size, resin behavior, and mold condition.
For parts under 100 mm, the process typically yields ±0.05 mm precision. For larger components, expect tolerances around ±0.3% of the dimension. These figures apply to well-controlled casting setups using silicone vacuum casting molds derived from high quality master patterns.
Several factors influence tolerances in practice:
- Master model quality: Using a precise 3D printed or CNC machined master reduces inherited dimensional errors.
- Material shrinkage: Urethane casting resins and polyurethane materials shrink differently, and mold designers must compensate accordingly.
- Temperature stability: Consistent thermal conditions during curing reduce distortion and maintain mold cavity integrity.
- Mold wear: Over time, silicone molds degrade, slightly reducing dimensional fidelity after 20–30 cycles.
How Much Does Vacuum Casting Cost?
Vacuum casting offers a unique cost structure that balances low upfront investment with flexibility in short-run production.
Tooling costs are typically USD 200–1,000 per mold, and per-part costs can range from USD 10 to 100, depending on resin type, part complexity, and finishing requirements.
However, there are several key cost drivers that influence the total project budget:
- Machine amortization: Professional vacuum casting machines such as MCP or Renishaw units cost USD 45,000–90,000, amortized across many projects.
- Labor costs: Skilled operators command USD 30–60 per hour, especially for manual tasks like demolding, trimming, and finishing.
- Electricity usage: Each casting cycle typically uses 0.5–1 kWh, especially during oven curing and vacuum chamber operation.
- Consumables: Costs include casting resins, mold release agents, mixing cups, and color pigments for in-mold tinting.
- Post-processing: Additional work like painting, assembly, silk-screen printing, or polishing adds further cost, especially for consumer products or electronics enclosures.
What are Safety Tips for Vacuum Casting?
Vacuum casting, while versatile and efficient, involves working with reactive resins, hot equipment, and pressurized systems.
You need to take essential precautions to ensure a safe working environment throughout the vacuum casting process. Personal protective equipment (PPE), ventilation, and equipment handling protocols are all critical parts of safe operation in prototype projects or low volume production.
- Wear nitrile gloves and chemical splash goggles: Polyurethane resins used in vacuum casting can irritate skin and eyes. Nitrile gloves resist chemical permeation, and goggles protect against accidental splashes during degassing or pouring.
- Use an organic-vapor respirator in well-ventilated spaces: Isocyanate-based urethane casting materials release vapors that are harmful if inhaled. Always mix resins in areas with proper airflow or fume extraction systems.
- Handle mold ovens with thermal gloves: Silicone molds may need oven curing, especially in high-temperature vulcanization (HTV) applications. Mold surfaces can reach 60–80 °C.
- Be cautious of pinch points in vacuum chambers: The casting box and vacuum lid can cause injuries if closed improperly or too quickly during the vacuum casting work stage.
What are Some Design Tips for Vacuum Casting?
Since silicone mold casting uses a soft tool around a rigid master model, your design choices influence mold life, part accuracy, and material flow. If you’re shifting from 3d printing or CNC machining to casting for production runs, applying specific design rules helps prevent costly remakes.
- Add draft angles: To make demolding easier, apply at least 1° of draft to vertical walls, especially in complex mold cavities.
- Avoid sharp internal corners: Fillets reduce stress concentrations and extend silicone mold life. Aim for radii ≥ 0.5 mm where possible.
- Consider part orientation for air evacuation: Orient parts to reduce air pockets and ensure even resin flow. Trapped air causes defects, especially near fine details or ribs.
- Plan for mold splitting: Complex parts may need multi-part molds or sliding inserts to release features like undercuts.
- Match surface finish expectations: Choose a high quality master model finish if your end product needs a matte, gloss, or textured look right out of the silicone mold.
Wall Thickness
Wall thickness plays a critical role in successful vacuum casting. You should aim for walls between 1.5 mm and 4 mm for optimal flow, cooling, and part stability. Going thinner than this can result in weak sections or uneven fill during the casting process.
The absolute minimum wall thickness is 0.75 mm, but this is only viable if reinforced by support features such as ribs. Maintaining uniform thickness throughout your design helps avoid material sink, distortion, or trapped air bubbles.
When wall thickness varies, especially in injection molding alternatives, it leads to inconsistent curing and stress points. Uniformity also improves mold longevity, especially when producing multiple parts using the same silicone mould.
Tolerances
Vacuum casting offers precise tolerances suitable for many prototype projects and batch production needs. For parts with dimensions under 100 mm, you can expect tolerances around ±0.05 mm.
For larger parts, the process allows for a dimensional variance of approximately ±0.3% of the nominal size.
This performance is comparable to other prototyping methods like 3D printing or CNC machining, but it depends heavily on the quality of your high quality master model and the material used. Shrinkage, typically around 0.15%, should always be factored into your designs.
Ribs
In vacuum casting, ribs are often used to reinforce walls without adding excessive material thickness. For best results, rib thickness should not exceed 60% of the wall it supports. This balance reduces the risk of sink marks or uneven cooling while ensuring structural integrity.
It’s also important to include generous fillets at rib roots, ideally 0.6 mm or larger. These smooth transitions minimize stress concentrations within the silicone mold and improve the resin flow.
Bosses
Bosses are critical for locating and fastening components within vacuum cast parts. To maintain strength and avoid defects during the casting process, match the wall thickness of the boss to the diameter of the hole it supports. For instance, a boss hole of 4 mm should have a wall thickness of 4 mm.
The minimum recommended boss height is 1 mm, which ensures sufficient definition in the silicone mold. Additionally, include 0.5 mm vent grooves near the boss base to help resin fill the cavity completely, avoiding trapped air and ensuring consistent quality. These vents improve casting flow, especially when using polyurethane resins with higher viscosity.
Undercuts
Vacuum casting is one of the few manufacturing processes where undercuts are not a limitation. The flexible nature of silicone molds allows you to include undercuts freely without the need for side-actions or complex tooling, which would be required in injection molding.
However, when your 3D model includes deep or mechanically locking undercuts, you’ll need to design in either tear-strips or multi-part silicone molds. These strategies enable mold halves to flex or be removed cleanly without damaging the master pattern or the final cast.
Embossed Details
When you’re adding logos, labels, or functional surface markings to your vacuum casting design, clear embossed or engraved details are fully achievable. For embossed features, keep the depth or height at a minimum of 1 mm, with a minimum stroke width of 1 mm and at least 1 mm of spacing between characters.
If you’re working with small text or fine features, engraved letters can be effective at depths as shallow as 0.25 mm. The vacuum casting process captures these sharp features with high fidelity, especially when the master model is 3D printed using SLA or CNC-machined with a smooth surface finish.
What are the Quality Control Measures in Vacuum Casting?
Achieving consistent results in vacuum casting depends on robust quality control protocols. You’re working with urethane resins and silicone molds, where variables like material properties and ambient conditions can impact part quality. That’s why in-process checks are critical.
You’ll typically begin by verifying resin viscosity and confirming the mix ratio by weight, especially with polyurethane systems, where slight deviations can affect curing and surface finish.
Dimensional accuracy is confirmed using CMM or laser scanning, comparing the vacuum cast part against the original 3D printed or CNC-machined master model. You’ll also want to visually inspect for surface defects, guided by AQL standards. For critical applications, especially in consumer products or the automotive industry, batch tensile testing helps ensure that mechanical properties meet requirements.
What is the Environmental Impact of Vacuum Casting?
Material waste is minimal, with most vacuum casting processes producing less than 5% scrap.
Silicone molds used in the process can be reused for 20 to 25 cycles in standard RTV setups and even longer with HTV, reducing tooling waste over time.
However, some urethane casting systems do contain volatile organic compounds (VOCs), especially isocyanate-based resins. You should consider alternative bio-based resins where available, especially for sustainable product development.
How Does Vacuum Casting Compare to Other Manufacturing Methods?
 100vw, 1600px” data-lazy-src=”https://www.3erp.com/wp-content/uploads/2025/02/3-min-1.jpg” />
<p id=) How Does Vacuum Casting Compare to Other Manufacturing Methods
How Does Vacuum Casting Compare to Other Manufacturing Methods
When you compare vacuum casting vs injection molding or other methods like CNC machining and 3D printing, the differences are clear. Each method has a specific strength, and your choice will depend on the product’s volume, budget, geometry, and material requirements.
The vacuum casting process uses a silicone mold formed around a high quality master model. This technique is ideal for replicating complex geometries and producing parts with excellent surface finish and dimensional accuracy.
Unlike injection molding, it doesn’t require hard tooling or high-pressure machinery, making it faster and more cost-effective for low volume production. Silicone vacuum casting is widely used in consumer products, electronics, medical prototypes, and automotive interior parts.
Compared to CNC machining, vacuum casting offers faster replication once the master pattern is created. CNC excels at tight tolerances and hard material machining, but struggles with undercuts and flexible parts.
Vacuum cast parts, by contrast, can integrate elastomers and soft-touch finishes right from the mold cavity.
Compared to 3D printing or CNC, vacuum casting also provides better part surface texture, improved aesthetics, and greater material flexibility for applications that require both rigid and flexible sections.
Where 3D printing materials are limited by printer type and surface layering, urethane casting in vacuum molds delivers better post-processing efficiency, clarity, and color pigment accuracy. While additive manufacturing is unmatched for design freedom, it’s less efficient for batch production of 10–500 units with consistent results.
Vacuum Casting vs Injection Molding
The vacuum casting process differs fundamentally from injection molding in both tooling setup and application.
Vacuum casting uses a silicone mold formed from a high quality master model, typically a 3D printed or CNC-machined part. Liquid polyurethane resin is poured into the mold under vacuum to remove air bubbles. Injection molding, on the other hand, involves molten thermoplastic injected into hardened steel or aluminum molds at high pressure—ideal for high-volume manufacturing.
When evaluating the differences between vacuum casting and injection molding, you need to consider six core factors that directly affect cost, lead time, quality, and scale.
Tooling cost is significantly lower in vacuum casting, ranging from $200 to $1,000 per silicone mold, compared to tens of thousands for metal injection molds. Lead times are also faster with vacuum casting—10 to 20 days versus 4 to 12 weeks for injection molding. This makes vacuum casting ideal for rapid prototyping, pre-launch testing, and low volume production (10 to 500 parts per run).
However, part cost per unit is higher in vacuum casting when scaled beyond a few hundred units. Tolerances are comparable for non-critical applications, with vacuum casting achieving ±0.05 mm or ±0.3% accuracy. Surface finish in vacuum casting is excellent—glossy, matte, or textured—directly reflecting the master pattern. Material choices, however, are more limited in vacuum casting, restricted to polyurethane resins, while injection molding supports a broader spectrum of thermoplastics and engineered polymers.
Here’s a quick side-by-side comparison across six key categories:
| Factor | Vacuum Casting | Injection Molding |
| Tooling Cost | $200–$1,000 | $10,000+ |
| Lead Time | 10–20 days | 4–12 weeks |
| Part Cost | $10–$100/unit | <$1/unit (at scale) |
| Tolerances | ±0.05 mm or ±0.3% | ±0.02–0.1 mm |
| Surface Finish | High (depends on master model) | High (depends on mold surface) |
| Material Choice | Polyurethane, elastomers, TPE, etc. | Broad range of thermoplastics, polymers |
Vacuum Casting vs 3D Printing
Vacuum casting involves creating a silicone mold from a high quality master model and casting parts under vacuum using polyurethane resins. 3D printing, on the other hand, builds parts layer by layer directly from a digital 3D model using various additive technologies.
You’ll notice clear trade-offs between these two. Vacuum casting excels in replicating parts with consistent dimensional accuracy and superior surface finish, especially for batch production volumes between 10 and 500 units. Once a master pattern is made, it allows you to produce multiple vacuum cast parts quickly. In contrast, 3D printing is ideal when flexibility and design freedom are your main priorities, especially in early-stage prototyping.
Here’s how the two compare across six key factors:
| Factor | Vacuum Casting | 3D Printing |
| Tooling Cost | $200–$1,000 per silicone mold | None, but printer and material costs vary |
| Lead Time | 10–20 days (including master pattern and mold) | 1–3 days for most prototypes |
| Part Cost | $10–$100 per part depending on resin, size, post-op | Lower for one-offs, higher for 100+ parts |
| Tolerances | ±0.05 mm or ±0.3% | ±0.1–0.5 mm depending on technology |
| Surface Finish | Smooth, matte or gloss directly from the mold | Layered texture unless post-processed |
| Material Choice | Wide range of urethane casting materials, elastomers | Limited to available 3D printing materials |
Vacuum Casting vs Vacuum Forming
Vacuum casting uses liquid resins poured into a silicone mold under vacuum conditions, curing into a solid form. Vacuum forming, by contrast, heats a plastic sheet and then draws it over a mold using vacuum pressure to form thin-walled components.
Vacuum casting is ideal for intricate, 3D geometries and parts with varying wall thicknesses. You can use it to replicate detailed features and undercuts that would be impossible with vacuum forming. On the other hand, vacuum forming is faster and more cost-effective for large, simple, thin-walled enclosures like packaging trays, covers, and housings.
Here’s how the two methods compare across six technical and economic factors:
| Factor | Vacuum Casting | Vacuum Forming |
| Tooling Cost | $200–$1,000 for silicone molds | $500–$2,000 for metal or wooden molds |
| Lead Time | 10–20 days including master model and mold curing | 3–7 days once mold is ready |
| Part Cost | $10–$100 per part depending on volume and resin | $1–$20 per part, typically lower for large parts |
| Tolerances | ±0.05 mm or ±0.3% for dimensions over 100 mm | ±0.5 mm or more depending on material thickness |
| Surface Finish | Matte, gloss, or textured from mold directly | Usually depends on mold surface; polishing adds cost |
| Material Choice | Urethane resins, elastomers, flexible and rigid combinations | Limited to thermoplastics like ABS, HIPS, PETG, PVC |
Vacuum Casting vs Centrifugal Casting
In vacuum casting, a polyurethane resin is poured into a silicone mold under vacuum pressure to eliminate air bubbles and ensure dimensional accuracy. Centrifugal casting, by contrast, relies on high-speed rotation of the mold to force molten material, usually metal or thermoset plastic, against the cavity walls via centrifugal force.
You’ll want to choose between these based on your part geometry, required material properties, and volume production goals. Vacuum casting is highly suited for rapid prototyping, consumer products, and short-run batches, especially when using a high quality master model to replicate complex features. Centrifugal casting is a better fit for cylindrical or symmetrical parts such as bushings, rings, or pipe sections, particularly where structural strength and high density are priorities.
Here’s how both processes stack up across six key comparison factors:
| Factor | Vacuum Casting | Centrifugal Casting |
| Tooling Cost | Low ($200–$1,000 for silicone molds) | Medium to high (metal molds and spin setup) |
| Lead Time | 10–20 days from design to production | 10–15 days for setup; faster once configured |
| Part Cost | $10–$100 depending on material and finishing | Higher for setup, but low per part at scale |
| Tolerances | ±0.05 mm or ±0.3%; ideal for complex, detailed components | ±0.25 mm; better for simple, concentric shapes |
| Surface Finish | Matte, gloss, or texture straight from the mold | Inner surface often rough; outer surface smoother post-machining |
| Material Choice | Urethane resin, elastomers, ABS-like plastics, silicone blends | Metals (aluminum, bronze, steel), thermoset plastics |
How to Choose a Vacuum Casting Service Provider?
Selecting the right vacuum casting service provider requires more than comparing prices.
You need a partner who understands your industry, your product requirements, and the technical details behind the vacuum casting process.
Start by assessing their experience with low volume production and whether they specialize in prototype projects or small-scale production runs.
A well-established provider will have a proven history in creating high quality master models, using either CNC machining or 3D printing techniques. Their knowledge of dimensional accuracy, mold performance, and casting materials plays a key role in ensuring your parts meet tolerance and surface finish expectations.
Check whether their equipment includes automated vacuum chambers and silicone mold systems designed for consistent output. A reliable provider should offer a wide material catalog that includes urethane casting resins, elastomers, and options for rigid or flexible parts.
Certifications such as ISO 9001 and ISO 13485 are signs of a serious quality control process. Lead time is another essential factor. You should ask how quickly they can deliver molds and finished vacuum cast components.
Also consider their capacity for mold size and part volume, especially if your application involves larger castings or precision prototypes.
Effective communication is crucial. You want a team that is responsive, transparent, and capable of guiding you through every step, from the master pattern to the final casting.
Also, 3ERP is fully capable of handling your vacuum casting and silicone molding needs. With extensive experience in manufacturing processes like silicone vacuum casting and rapid prototyping, the company provides exceptional part quality with dimensional precision up to ±0.3%, or ±0.3 mm for parts under 100 mm.
The mold size is limited by the vacuum chamber’s dimensions, which measure 1900 × 900 × 750 mm, with a maximum casting volume of 10 liters. This makes it suitable for a wide range of vacuum casting products across consumer goods, automotive components, and functional prototypes.
The process at 3ERP starts with the creation of a master model, typically produced via CNC machining, though 3D printed alternatives are also used. This model is then immersed in liquid silicone, forming a mold once cured.
After the mold is sliced open and the master removed, casting resin is poured into the mold cavity inside the vacuum chamber. This removes air pockets and prevents defects such as surface bubbles.
After curing in an oven, the part is demolded and ready for use. The same silicone mold can be reused for up to 20 castings, offering a reliable solution for consistent, short-run production with excellent surface texture and part consistency.
Conclusion
If you’re looking for a way to turn your idea into something real, fast and without breaking the bank, vacuum casting might be exactly what you need. We’ve seen how it fills that sweet spot between 3D printing and injection molding. You get great surface finishes, dependable dimensional accuracy, and a wide range of materials to choose from. Whether you’re building early prototypes, custom parts, or limited-run products, this process gives you the flexibility to move quickly and still keep quality high.
At the end of the day, vacuum casting gives you more control, less stress, and faster results, especially when paired with a solid master model from CNC machining or 3D printing. It’s not just for engineers in lab coats, it’s for anyone who wants to bring smart ideas to life without getting stuck in high-volume tooling.
Frequently Asked Questions
1. Is Vacuum Casting Suitable for Production Parts?
Yes, vacuum casting is suitable for production parts, especially for low volume production and short-run manufacturing. While not ideal for high-volume manufacturing processes like injection molding, it performs exceptionally well for batches under a few hundred units. Vacuum casting produces consistent part quality with excellent surface texture, making it a great choice for consumer goods, enclosures, and functional prototypes. The dimensional accuracy, material variety, and tooling cost savings make it a preferred solution when production runs don’t justify full-scale injection molds.
2. Can Vacuum Casting Replicate Complex Geometries?
Yes, vacuum casting can replicate complex geometries with a high degree of detail. Thanks to the flexibility of silicone molds and the use of vacuum chambers, even parts with undercuts, thin walls, or intricate internal cavities can be accurately formed. The process begins with a high quality master model, often produced using 3D printing or CNC machining. Once the silicone mold captures this geometry, casting resin flows into every corner under vacuum pressure, minimizing air pockets.
3. How Long Does a Silicone Mold Last in Vacuum Casting?
A silicone mold used in vacuum casting typically lasts for 20 to 25 shots when using room temperature vulcanized (RTV) silicones. This lifespan can vary depending on part geometry, casting resin type, and curing temperatures. For more robust molds using high-temperature vulcanized (HTV) silicones, the mold can yield up to 300–500 castings. Reusability depends on mold maintenance, part size, and overall material wear.